Äîêóìåíòàöèÿ è îïèñàíèÿ www.docs.chipfind.ru
REV. A
Information furnished by Analog Devices is believed to be accurate and
reliable. However, no responsibility is assumed by Analog Devices for its
use, nor for any infringements of patents or other rights of third parties
which may result from its use. No license is granted by implication or
otherwise under any patent or patent rights of Analog Devices.
a
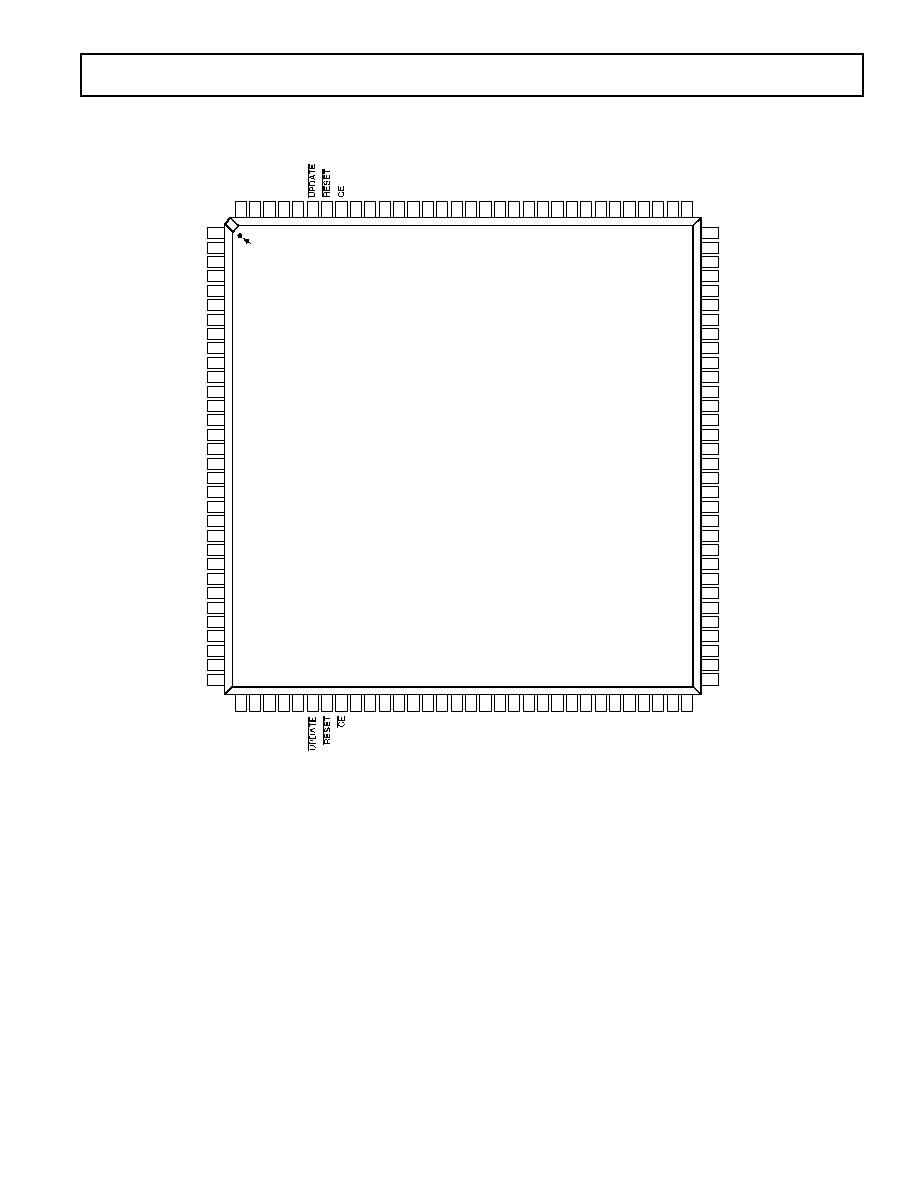
AD8116*
One Technology Way, P.O. Box 9106, Norwood, MA 02062-9106, U.S.A.
Tel: 781/329-4700
World Wide Web Site: http://www.analog.com
Fax: 781/326-8703
© Analog Devices, Inc., 1999
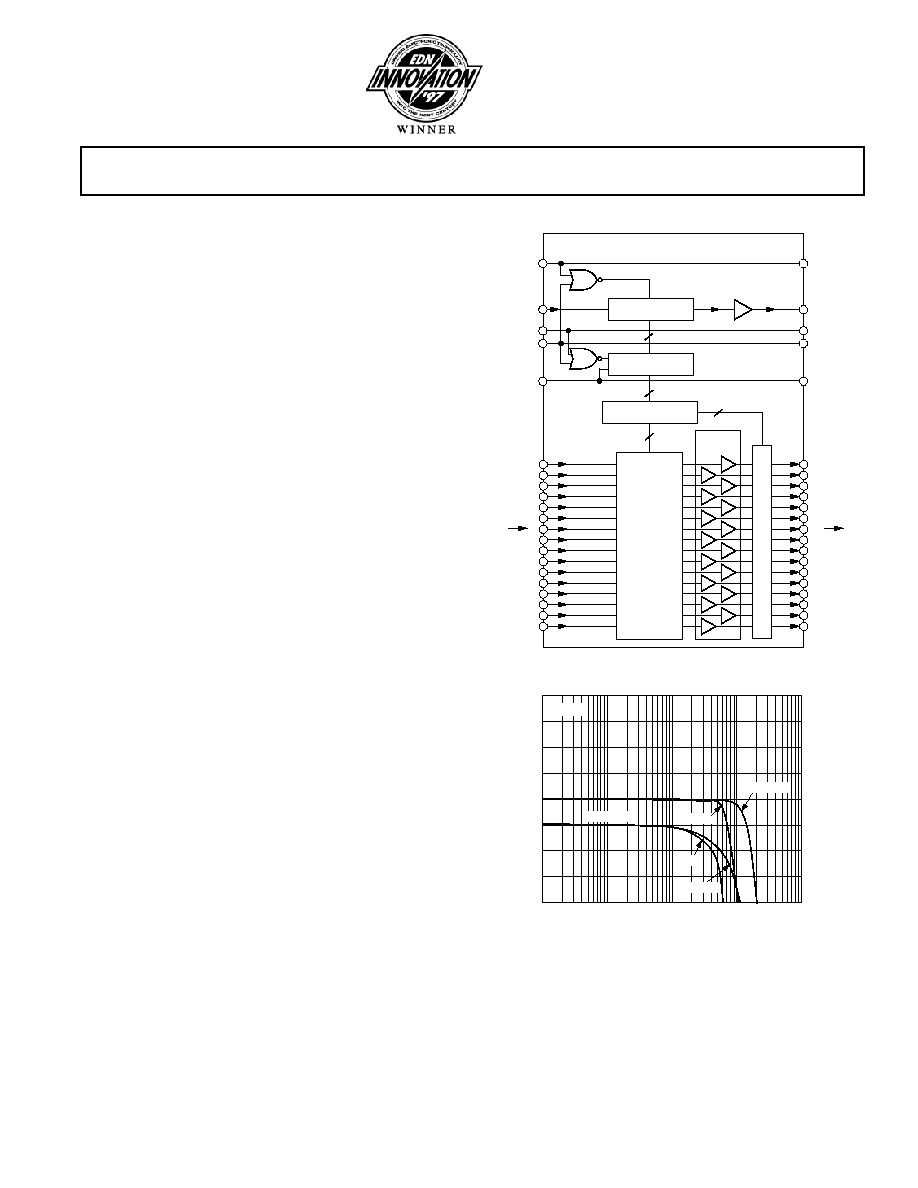
FUNCTIONAL BLOCK DIAGRAM
AD8116
SWITCH
MATRIX
OUTPUT
BUFFER
ENABLE/DISABLE
80
80
256
80-BIT SHIFT REG.
PARALLEL LATCH
DECODE
16
5:16 DECODERS
16
+1
+1
+1
+1
+1
+1
+1
+1
+1
+1
+1
+1
+1
+1
+1
+1
CLK
DATA IN
UPDATE
CE
RESET
16 INPUTS
CLK
DATA OUT
UPDATE
CE
RESET
16 OUTPUTS
SET INDIVIDUAL OR
RESET ALL OUTPUTS
TO "OFF"
200 MHz, 16 16 Buffered
Video Crosspoint Switch
FREQUENCY Hz
+4
+3
4
100k
1G
1M
MAGNITUDE dB
10M
100M
0
1
2
3
+2
+1
+0.5
+0.4
0.3
0
0.1
0.2
+0.3
+0.2
0.1dB FLATNESS dB
+0.1
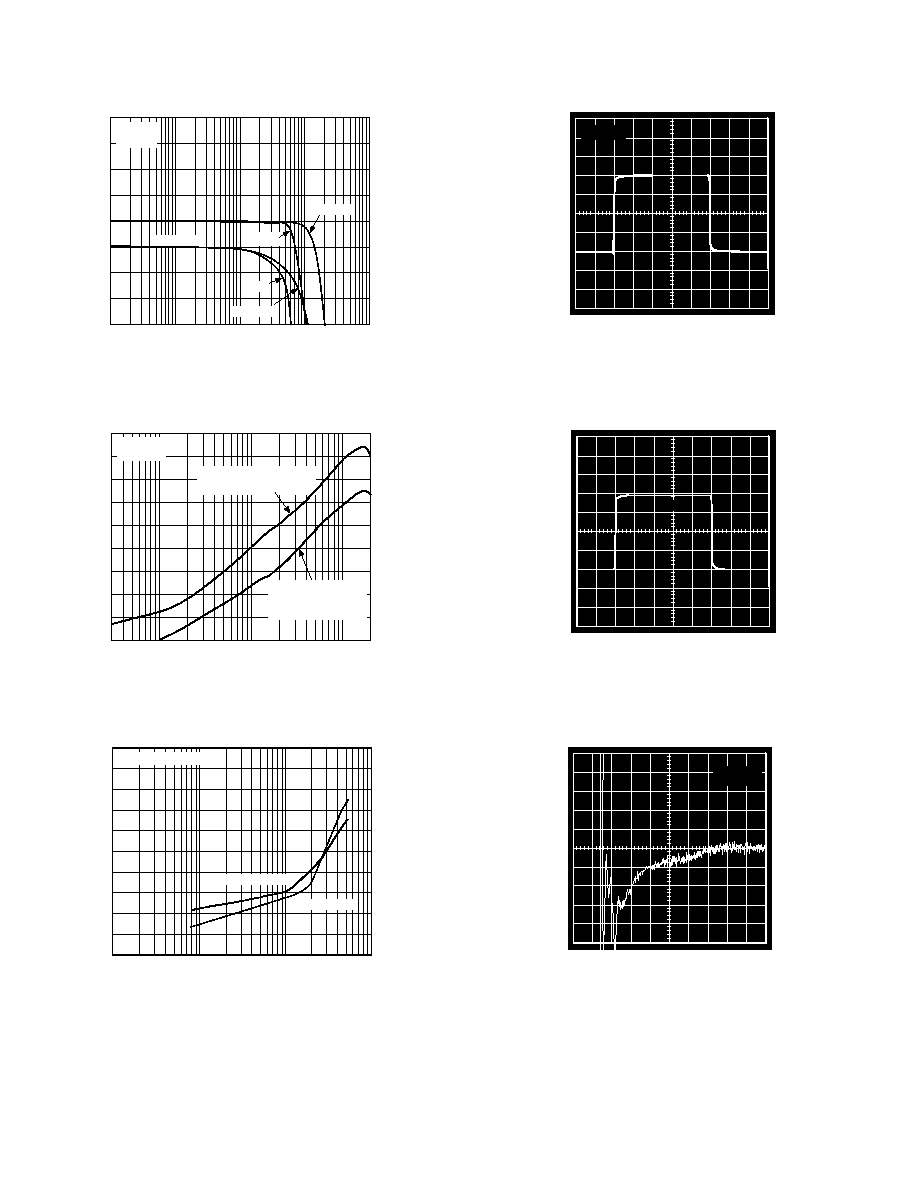
2V p-p
200mV p-p
FLATNESS
R
L
=150
200mV p-p
2V p-p
Figure 1. Frequency Response
FEATURES
Large 16
16 High Speed Nonblocking Switch Array
Switch Array Controllable via an 80-Bit Serial Word
Serial Data Out Allows "Daisy Chaining" of Multiple
AD8116s to Create Large Switch Arrays Over 256 256
Complete Solution
Buffered Inputs
16 Individual Output Amplifiers
Drives 150
Loads
Excellent Video Performance
60 MHz 0.1 dB Gain Flatness
0.01% Differential Gain Error (R
L
= 150 )
0.01 Differential Phase Error (R
L
= 150 )
Excellent AC Performance
200 MHz 3 dB Bandwidth
300 V/ s Slew Rate
Low Power of 900 mW (3.5 mW per Point)
Low All Hostile Crosstalk of 70 dB @ 5 MHz
Output Disable Allows Direct Connection of Multiple
Device Outputs
Chip Enable Allows Selection of Individual AD8116s in
Large Arrays (or Parallel Programming of AD8116s)
Reset Pin Allows Disabling of All Outputs (Connected
Through a Capacitor to Ground Provides "Power-
On" Reset Capability)
128-Lead LQFP Package (14 mm 14 mm)
APPLICATIONS
Routing of High Speed Signals Including:
Composite Video (NTSC, PAL, S, SECAM, etc.)
Component Video (YUV, RGB, etc.)
3-Level Digital (HDB3)
Video on Demand
Ultrasound
Communication Satellites
PRODUCT DESCRIPTION
The AD8116 is a high speed 16
×
16 video crosspoint switch
matrix. It offers a 3 dB signal bandwidth greater than 200 MHz
and channel switch times of 60 ns with 0.1% settling. With 70 dB
of crosstalk and 105 dB of isolation (@ 5 MHz), the AD8116
is useful in many high speed applications. The differential gain
and differential phase errors of better than 0.01% and 0.01
°
,
respectively, along with 0.1 dB flatness out to 60 MHz make the
AD8116 ideal for video signal switching.
The AD8116 includes output buffers that can be placed into a
high impedance state for paralleling crosspoint outputs so that
off channels do not load the output bus. It operates on voltage
supplies of
±
5 V while consuming only 90 mA of idle current.
The channel switching is performed via a serial digital control
that can accommodate "daisy chaining" of several devices.
The AD8116 is packaged in a 128-lead LQFP package occupy-
ing only 0.36 square inches, and is specified over the commer-
cial temperature range of 0
°
C to +70
°
C.
*Patent Pending.

2
REV. A
AD8116SPECIFICATIONS
(V
S
= 5 V, T
A
= +25 C, R
L
= 1 k unless otherwise noted)
Limit
Reference
Parameter
Conditions
Min
Typ
Max
Units
Figure
DYNAMIC PERFORMANCE
3 dB Bandwidth
200 mV p-p, R
L
= 150
200
MHz
6
1 V p-p, R
L
= 150
120
MHz
2 V p-p, R
L
= 150
80
MHz
6
Slew Rate
2 V Step, R
L
= 150
300
V/
µ
s
10
Settling Time
0.1%, 2 V Step, R
L
= 150
60
ns
11
Gain Flatness
0.05 dB, 200 mV p-p, R
L
= 150
25
MHz
6
0.05 dB, 2 V p-p, R
L
= 150
20
MHz
6
0.1 dB, 200 mV p-p, R
L
= 150
60
MHz
6
0.1 dB, 2 V p-p, R
L
= 150
45
MHz
6
NOISE/DISTORTION PERFORMANCE
Differential Gain Error
NTSC or PAL, R
L
= 1 k
0.01
%
NTSC or PAL, R
L
= 150
0.01
%
Differential Phase Error
NTSC or PAL, R
L
= 1 k
0.01
Degrees
NTSC or PAL, R
L
= 150
0.01
Degrees
Crosstalk, All Hostile
= 5 MHz
70
dB
7
= 10 MHz
60
dB
7
Off Isolation, Input-Output
= 10 MHz, R
L
= 150
, One Channel
105
dB
16
Input Voltage Noise
0.01 MHz to 50 MHz
15
nV/
Hz
13
DC PERFORMANCE
Gain
No Load
0.995 0.999
1.000
V/V
R
L
= 1 k
0.992 0.999
1.000
V/V
Gain Matching
No Load, Ch-Ch
0.15
%
R
L
= 1 k
, Ch-Ch
0.5
%
OUTPUT CHARACTERISTICS
Output Offset Voltage
Worst Case All Switch Configurations
15
45
mV
22
Output Impedance
DC, Enabled
0.2
17
Disabled
1
10
M
14
Output Disable Capacitance
3
pF
14
Output Leakage Current
Disabled
1
µ
A
Output Voltage Range
±
2.5
±
3
V
Output Current
20
40
mA
Short Circuit Current
65
mA
INPUT CHARACTERISTICS
Input Voltage Range
±
2.5
±
3
V
Input Capacitance
Any Switch Configuration
5
pF
18
Input Resistance
1
10
M
18
Input Bias Current
2
5
µ
A
SWITCHING CHARACTERISTICS
Enable On Time
60
ns
Switching Time
50%
UPDATE to 1% Output Settling,
50
ns
21
2 V Step
Switching Transient (Glitch)
15
mV p-p
15
POWER SUPPLIES
Supply Current
AVCC, Outputs Enabled, No Load
75
95
mA
AVCC,
Outputs Disabled
25
mA
AVEE, Outputs Enabled, No Load
70
95
mA
AVEE,
Outputs Disabled
22.5
mA
DVCC, Outputs Enabled, No Load
25
35
mA
DVEE, Outputs Enabled, No Load
10
15
mA
Supply Voltage Range
±
4.5 to
±
5.5
V
PSRR
= 100 kHz
60
dB
12
= 1 MHz
40
dB
12
OPERATING TEMPERATURE RANGE
Temperature Range
Operating (Still Air)
0 to +70
°
C
JA
Operating (Still Air)
37
°
C/W
Specifications subject to change without notice.
AD8116
3
REV. A
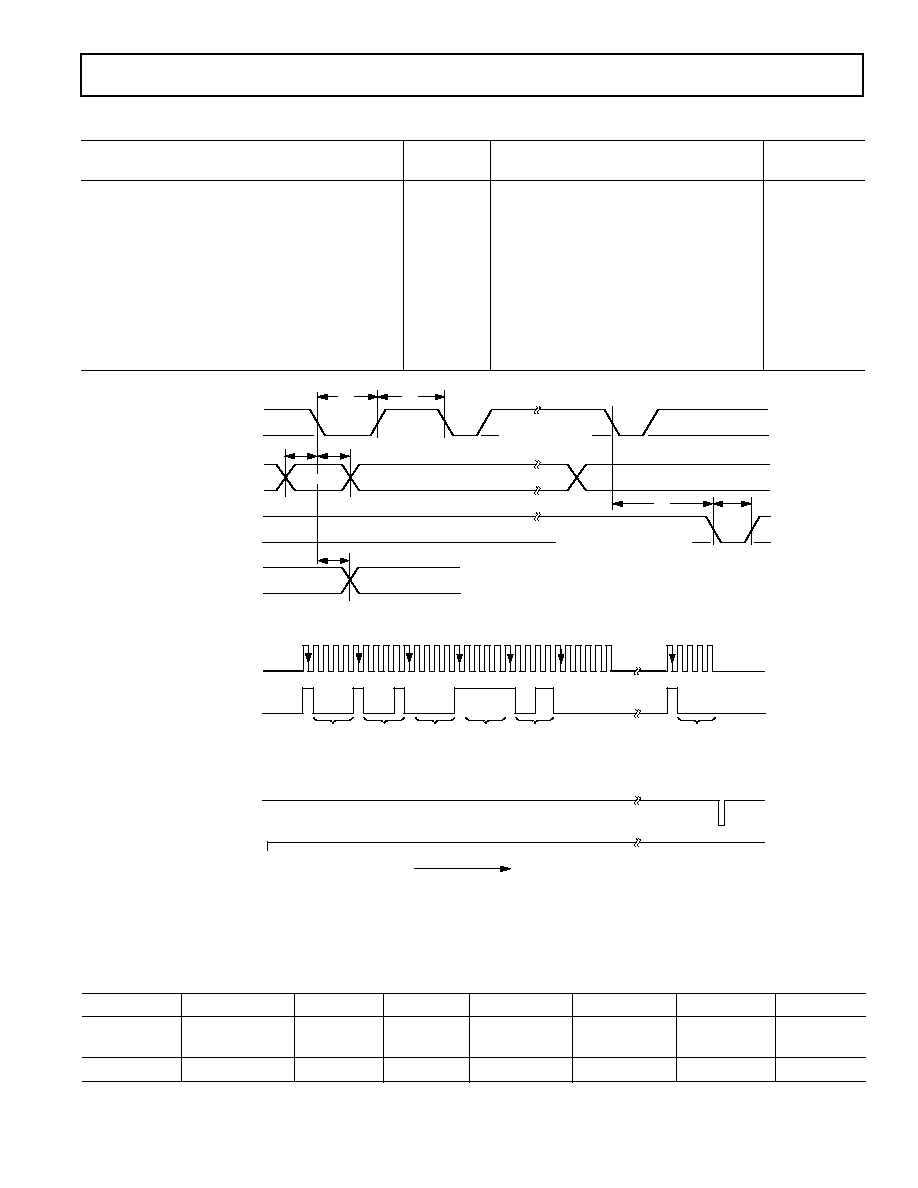
TIMING CHARACTERISTICS
Limit
Parameter
Symbol
Min
Typ
Max
Units
Data Setup Time
t
1
20
ns
CLK Pulsewidth
t
2
100
ns
Data Hold Time
t
3
20
ns
CLK Pulse Separation
t
4
100
ns
CLK to
UPDATE Delay
t
5
0
ns
UPDATE Pulsewidth
t
6
50
ns
CLK to DATA OUT Valid
t
7
200
ns
Propagation Delay,
UPDATE to Switch On or Off
50
ns
Data Load Time, CLK = 5 MHz
16
µ
s
CLK,
UPDATE Rise and Fall Times
100
ns
RESET Time
200
ns
LOAD DATA INTO
SERIAL REGISTER
ON FALLING EDGE
1
0
1
0
DATA IN
CLK
1 = LATCHED
UPDATE
0 = TRANSPARENT
DATA OUT
OUT15 (D4)
OUT15 (D3)
OUT00 (D0)
TRANSFER DATA FROM SERIAL
REGISTER TO PARALLEL
LATCHES DURING LOW LEVEL
t
1
t
3
t
7
t
2
t
4
t
6
t
5
CLOCK
DATA IN
UPDATE
1 2 3 4 5 6 7 8 9 10
15
20
25
75
79
T = 0
INCREASING TIME
ENABLE OUTPUT 15
ENABLE OUTPUT 14
CONNECT TO
INPUT 01
DISABLE OUTPUT 13
DON'T CARE
ENABLE OUTPUT 12
CONNECT TO
INPUT 15
CONNECT TO
INPUT 03
CONNECT TO
NPUT 00
ENABLE OUTPUT 11
ENABLE OUTPUT 00
CONNECT TO
INPUT 00
0
Figure 2. Timing Diagram and Programming Example
Table I. Logic Levels
V
IH
V
IL
V
OH
V
OL
I
IH
I
IL
I
OH
I
OL
CLK, DATA IN,
CLK, DATA IN,
DATA OUT
DATA OUT
CLK, DATA IN,
CLK, DATA IN,
DATA OUT
DATA OUT
CE, UPDATE
CE, UPDATE
CE, UPDATE
CE, UPDATE
2.0 V min
0.8 V max
2.7 V min
0.5 V max
20
µ
A max
400
µ
A min
400
µ
A max
3.0 mA min
AD8116
4
REV. A
CAUTION
ESD (electrostatic discharge) sensitive device. Electrostatic charges as high as 4000 V readily
accumulate on the human body and test equipment and can discharge without detection.
Although the AD8116 features proprietary ESD protection circuitry, permanent damage may
occur on devices subjected to high energy electrostatic discharges. Therefore, proper ESD
precautions are recommended to avoid performance degradation or loss of functionality.
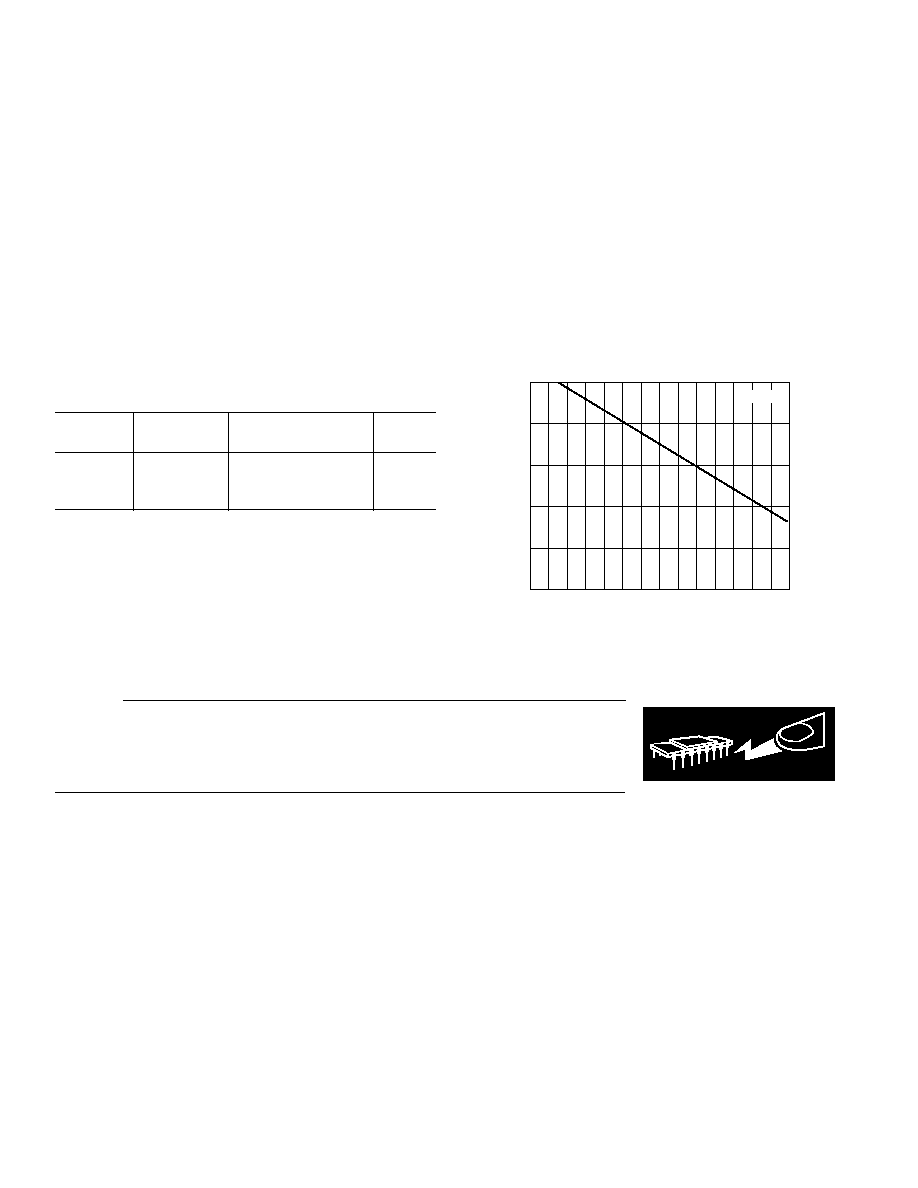
MAXIMUM POWER DISSIPATION
The maximum power that can be safely dissipated by the
AD8116 is limited by the associated rise in junction tempera-
ture. The maximum safe junction temperature for plastic
encapsulated devices is determined by the glass transition
temperature of the plastic, approximately +150
°
C. Temporarily
exceeding this limit may cause a shift in parametric performance
due to a change in the stresses exerted on the die by the package.
Exceeding a junction temperature of +175
°
C for an extended
period can result in device failure.
While the AD8116 is internally short circuit protected, this may
not be sufficient to guarantee that the maximum junction temp-
erature (+150
°
C) is not exceeded under all conditions. To
ensure proper operation, it is necessary to observe the maximum
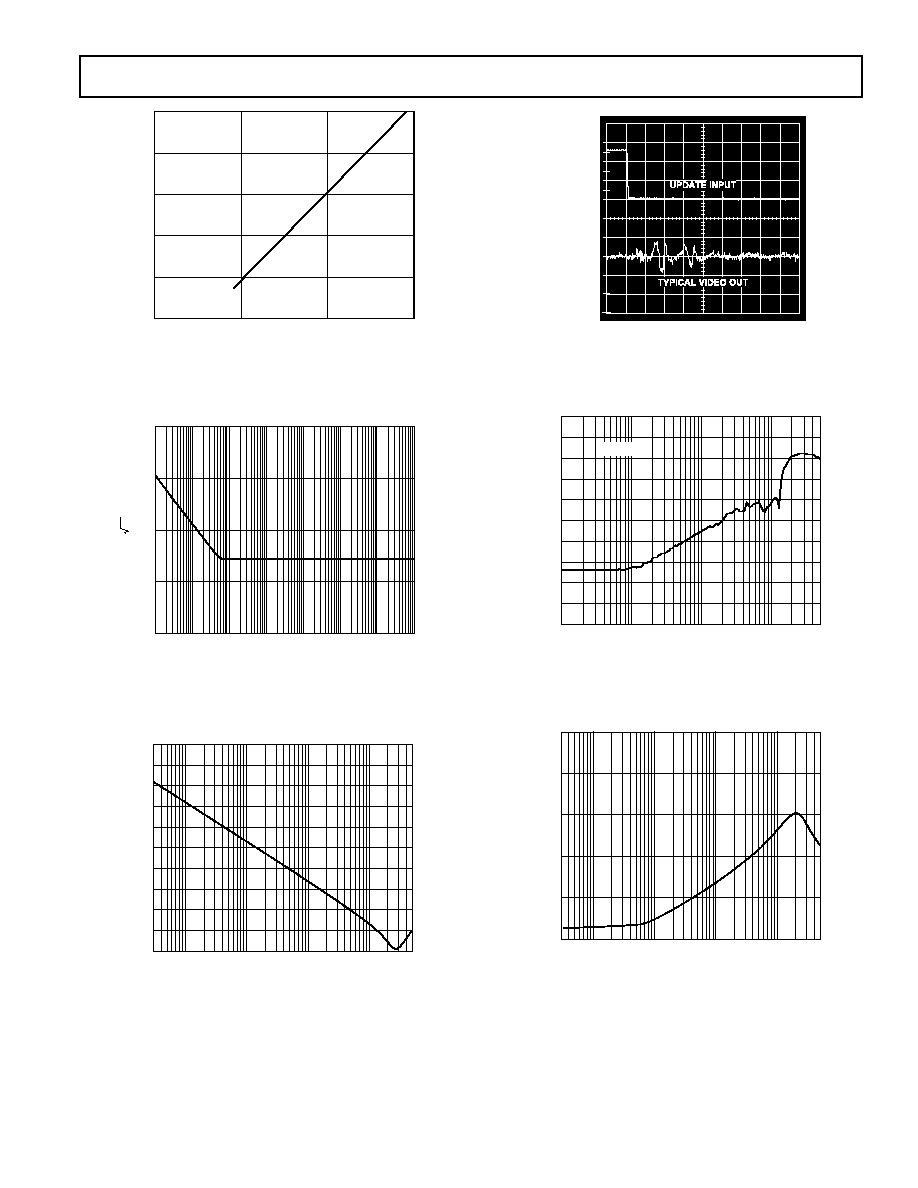
power derating curves shown in Figure 3.
AMBIENT TEMPERATURE C
5.0
MAXIMUM POWER DISSIPATION Watts
4.0
0
50
80
40 30 20 10
0
10
20
30
40
50
60
70
3.0
2.0
1.0
T
J
= 150 C
90
Figure 3. Maximum Power Dissipation vs. Temperature
ABSOLUTE MAXIMUM RATINGS
1
Supply Voltage . . . . . . . . . . . . . . . . . . . . . . . . . . . . . . . .12.0 V
Internal Power Dissipation
2
AD8116 128-Lead Plastic LQFP (ST) . . . . . . . . . . . . 3.5 W
Input Voltage . . . . . . . . . . . . . . . . . . . . . . . . . . . . . . . . . . .
±
V
S
Output Short Circuit Duration
. . . . . . . . . . . . . . . . . . . . Observe Power Derating Curves
Storage Temperature Range . . . . . . . . . . . . 65
°
C to +125
°
C
Lead Temperature Range (Soldering 10 sec) . . . . . . . . +300
°
C
NOTES
1
Stresses above those listed under Absolute Maximum Ratings may cause perma-
nent damage to the device. This is a stress rating only; functional operation of the
device at these or any other conditions above those indicated in the operational
section of this specification is not implied. Exposure to absolute maximum rating
conditions for extended periods may affect device reliability.
2
Specification is for device in free air (T
A
= +25
°
C):
128-lead plastic LQFP (ST):
JA
= 37
°
C/W.
ORDERING GUIDE
Temperature
Package
Package
Model
Range
Description
Option
AD8116JST
0
°
C to +70
°
C
128-Lead Plastic LQFP
ST-128A
(14 mm
×
14 mm)
AD8116-EB
Evaluation Board
WARNING!
ESD SENSITIVE DEVICE

AD8116
5
REV. A
Table II. Operation Truth Table
Control Lines
CE
UPDATE
CLK
DATA IN
DATA OUT
RESET
Operation/Comment
1
X
X
X
X
1
No change in logic.
0
1
f
Data
i
Data
i-80
1
The data on the DATA IN line is loaded into the
serial register. The first bit clocked into the serial
register appears at DATA OUT 80 clocks later.
0
0
X
X
X
1
Data in the serial shift register transfers into the
parallel latches that control the switch array.
Latches are transparent.
X
X
X
X
X
0
Asynchronous operation. All outputs are disabled.
Remainder of logic is unchanged.
256
DECODE
SWITCH MATRIX
LE
D LE
D LE
D LE
D LE
D LE
D
LE
D LE
D LE
D LE
D LE
D LE
D
EN
0
LSB
1
2
3
EN
MSB
0
LSB
1
2
3
EN
MSB
0
CLR Q
Q
Q
Q
Q
Q
CLR
CLR Q
Q
Q
Q
Q
Q
5
4
3
2
1
0
79
78
77
76
75
74
OUT14 OUT15 OUT15 OUT15 OUT15 OUT15
OUT0
OUT0
OUT0
OUT0
OUT0
OUT1
D
D
D
D
D
D
Q
Q
Q
Q
Q
Q
CLK
CLK
CLK
CLK
CLK
CLK
D
D
D
D
D
D
Q
Q
Q
Q
Q
Q
CLK
CLK
CLK
CLK
CLK
CLK
OUTPUT CH
CH BIT #
SERIAL BIT #
DATA IN
DATA OUT
CLK
OUTPUT
ENABLE
16
Figure 4. Logic Diagram
AD8116
6
REV. A
PIN FUNCTION DESCRIPTIONS
Pin Name
Pin Numbers
Pin Description
INxx
2, 4, 6, 8, 10, 12, 14, 16, 18,
Analog Inputs; xx = Channel No. 00 thru 15.
20, 22, 24, 26, 28, 30, 32
DATA IN
37, 126
Serial Data Input, TTL Compatible.
CLK
36, 125
Serial Clock, TTL Compatible. Falling edge triggered.
DATA OUT
35, 124
Serial Data Out, TTL Compatible.
UPDATE
38, 123
Enable (Transparent) "Low." Allows serial register to connect directly to switch
matrix. Data latched when "high."
RESET
39, 122
Disable Outputs, Enable "Low."
CE
40, 121
Chip Enable, Enable "Low." Must be "low" to clock in & latch data.
OUTyy
65, 67, 69, 71, 73, 75, 77, 79,
Analog Outputs yy = Channel Nos. 00 thru 15.
81, 83, 85, 87, 89, 91, 93, 95
AGND
1, 3, 5, 7, 9, 11, 13, 15, 17, 19,
Analog Ground for inputs and switch matrix.
21, 23, 25, 27, 29, 31, 33, 128
DVCC
34, 39, 127
+5 V for Digital Circuitry.
DGND
41, 120
Ground for Digital Circuitry.
DVEE
42, 119
5 V for Digital Circuitry.
AVEE
43, 44, 45, 116, 117, 118
5 V for Inputs and Switch Matrix.
AVCC
46, 47, 48, 113, 114, 115
+5 V for Inputs and Switch Matrix.
AGNDxx
5663, 97104
Ground for Output Amp, xx = Output Channel Nos. 00 thru 15. Must be connected.
AVCC00
96
+5 V for Output Channel 00. Must be connected.
AVCC15
64
+5 V for Output Channel 15. Must be connected.
AVCCxx/yy
68, 72, 76, 80, 84, 88, 92
+5 V for Output Amplifier that is shared by Channel Nos. xx and yy. Must be connected.
AVEExx/yy
66, 70, 74, 78, 82, 86, 90, 94
5 V for Output Amplifier that is shared by Channel Nos. xx and yy. Must be connected.
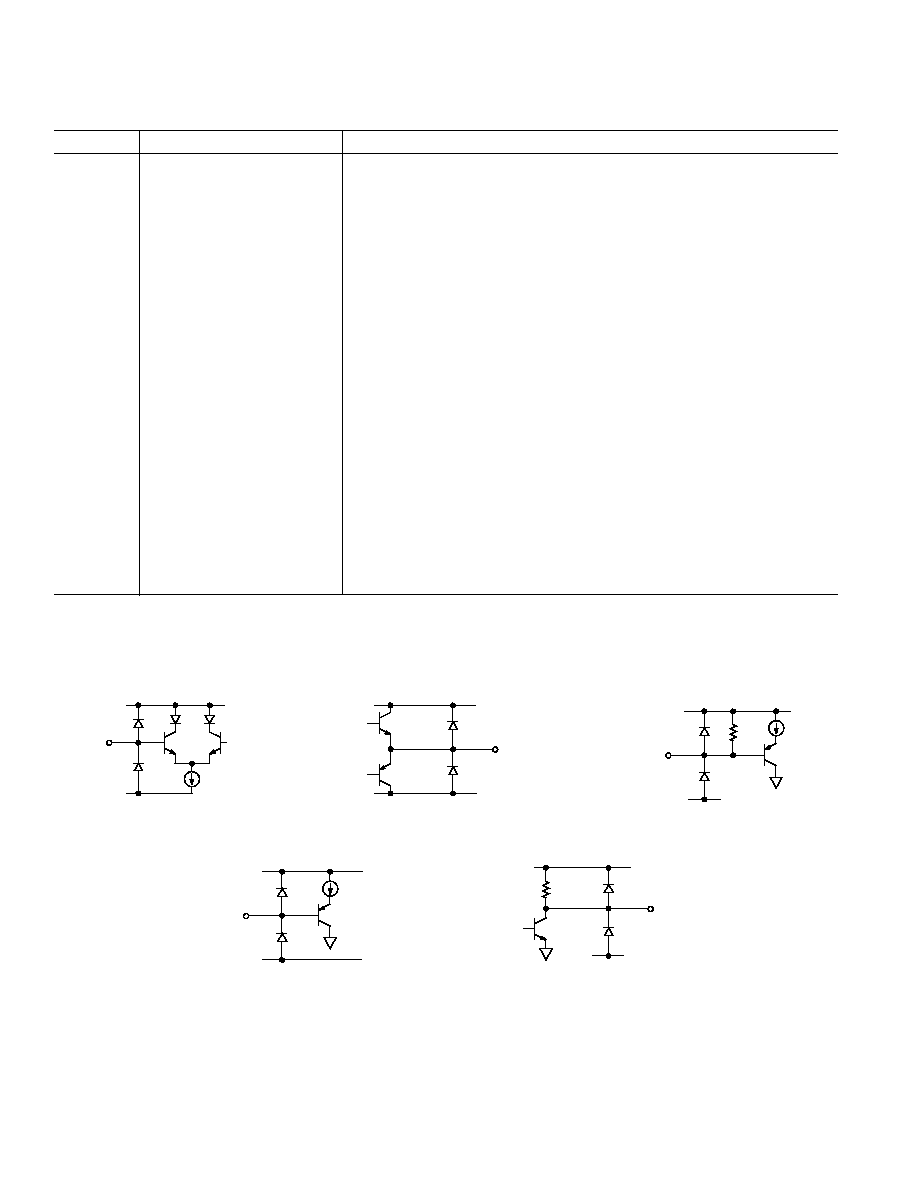
Figure 5. I/O Pin Schematics
ESD
ESD
INPUT
V
CC
V
EE
a. Analog Input
ESD
ESD
OUTPUT
V
CC
V
EE
b. Analog Output
ESD
ESD
RESET
V
CC
20k
c. Reset Input
ESD
ESD
INPUT
V
CC
V
EE
d. Logic Input
ESD
ESD
OUTPUT
V
CC
V
EE
2k
e. Logic Output
AD8116
7
REV. A
PIN CONFIGURATION
34
35
36
37
38
40
41
42
43
44
45
46
47
48
49
50
51
52
33
39
64
63
62
61
60
59
56
55
54
53
58
57
11
10
16
15
14
13
18
17
20
19
22
21
12
24
23
26
25
28
27
30
29
32
31
5
4
3
2
7
6
9
8
1
12
0
12
1
12
2
123
124
125
126
127
12
8
119
11
1
11
8
11
7
11
6
11
5
11
4
11
3
11
2
11
0
10
9
10
8
10
7
10
6
10
5
10
4
10
3
10
2
10
1
10
0
99
98
97
92
93
95
90
91
88
89
87
96
86
94
81
82
83
84
79
80
78
76
77
85
75
73
74
71
72
69
70
67
68
66
65
PIN 1
IDENTIFIER
TOP VIEW
(Not to Scale)
AGND
DVCC
DATA IN
CLK
DATA OUT
DGND
DVEE
AVEE
AVEE
AVEE
AVCC
AVCC
AVCC
NC
NC
NC
NC
AGND
DVCC
DATA OUT
CLK
DATA IN
DGND
DVEE
AVEE
AVEE
AVEE
AVCC
AVCC
AVCC
NC
NC
NC
NC
AVCC00
OUT00
AVEE00/01
OUT01
AVCC01/02
OUT02
AVEE02/03
OUT03
AVCC03/04
OUT04
AVEE04/05
OUT05
AVCC05/06
AVEE10/11
OUT11
AVCC11/12
OUT12
AVEE12/13
OUT13
AVCC13/14
OUT14
AGND
IN00
AGND
IN01
AGND
IN02
AGND
IN03
AGND
IN04
AGND
IN05
AGND
IN06
AGND
IN07
AGND
IN08
AGND
IN09
AGND
IN10
AGND
IN11
AGND
IN12
AGND
IN13
AGND
IN14
AGND
IN15
NC
NC
NC
AGND15
AGND14
AGND13
AGND12
AGND11
AGND10
AGND09
AGND08
AVCC15
AVEE14/15
OUT15
NC
NC
NC
NC
AGND00
AGND01
AGND02
AGND03
AGND04
AGND05
AGND06
AGND07
OUT06
AVEE06/07
OUT07
AVCC07/08
OUT08
AVEE08/09
OUT09
AVCC09/10
OUT10
AD8116
128L LQFP
(14mm x 14mm)
NC = NO CONNECT
AD8116
8
REV. A
100mV p-p
100ns/DIV
25mV/DIV
Figure 9. Step Response, 100 mV Step
100ns/DIV
500mV/DIV
2V p-p
Figure 10. Step Response, 2 V Step
2mV/DIV
= 0.1%/DIV
20ns/DIV
0
20
40
60
80
100 120 140 160 180
2V STEP
R
L
= 150
Figure 11. Settling Time
Typical Performance Characteristics
FREQUENCY Hz
+4
+3
4
100k
1G
1M
MAGNITUDE dB
10M
100M
0
1
2
3
+2
+1
+0.5
+0.4
0.3
0
0.1
0.2
+0.3
+0.2
FLATNESS dB
+0.1
2V p-p
200mV p-p
FLATNESS
R
L
=150
C
L
=0pF
200mV p-p
2V p-p
Figure 6. Frequency Response
FREQUENCY Hz
10
20
100
300k
200M
1M
10M
100M
CROSSTALK dB
50
70
80
90
30
40
60
R
L
= 1k
R
S
= 37.5
ALL HOSTILE CROSSTALK
V
IN
= 632mV p-p
ADJACENT CHANNEL
CROSSTALK
V
IN
= 632mV p-p
Figure 7. Crosstalk vs. Frequency
HARMONIC DISTORTION dB
0
10
100
20
30
40
50
60
70
80
90
FREQUENCY Hz
100k
1M
10M
100M
2ND HARMONIC
V
IN
= 2V p-p, R
L
= 150
3RD HARMONIC
Figure 8. Total Harmonic Distortion
5
4
3
2
1
0
20
10
0
10
20
1V/DIV
10mV/DIV
50ns/DIV
Figure 15. Switching Transient (Glitch)
FREQUENCY Hz
50
60
150
100k
500M
1M
10M
100M
90
120
130
140
70
80
110
100
OFF ISOLATION dB
V
IN
= 2V p-p
Figure 16. Off Isolation, Input-Output
OUTPUT IMPEDANCE
FREQUENCY Hz
10,000
0.1
100k
500M
1M
10M
100M
100
1
1000
10
Figure 17. Output Impedance, Enabled
FREQUENCY Hz
POWER SUPPLY REJECTION dB
20
30
70
10k
10M
100k
1M
40
50
60
Figure 12. PSRR vs. Frequency
FREQUENCY Hz
316
100
3.16
10
100M
100
nV/ Hz
1k
10k
100k
1M
10M
31.6
10
Figure 13. Voltage Noise vs. Frequency
FREQUENCY Hz
10M
100
100k
500M
1M
10M
100M
100k
1k
1M
10k
OUTPUT IMPEDANCE
Figure 14. Output Impedance, Disabled
Typical Performance CharacteristicsAD8116
9
REV. A
AD8116
10
REV. A
INPUT IMPEDANCE
FREQUENCY Hz
10M
100
100k
500M
1M
10M
100M
100k
1k
1M
10k
30k
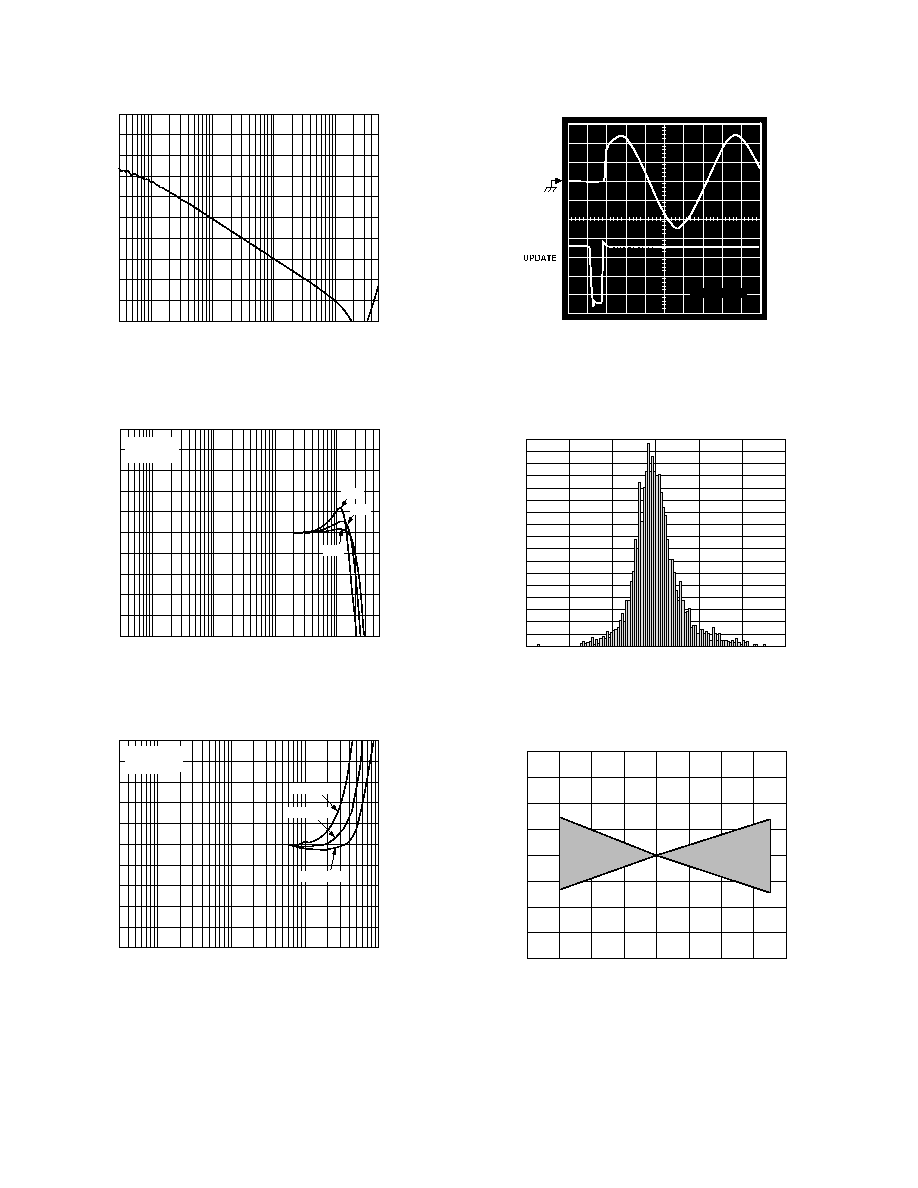
Figure 18. Input Impedance vs. Frequency
15
100k
500M
1M
10M
100M
12
30pF
V
IN
= 200mV
R
L
= 150
30k
9
6
3
0
+3
+6
+9
+12
+15
FREQUENCY Hz
GAIN dB
18pF
12pF
Figure 19. Frequency Response vs. Capacitive Load
FLATNESS dB
FREQUENCY Hz
0.5
100k
1M
10M
100M
30k
0.4
0.3
0.2
0.1
0
+0.1
+0.2
+0.3
+0.4
+0.5
C
L
= 18pF
C
L
= 12pF
C
L
= 30pF
V
IN
= 200mV
R
L
= 150
Figure 20. Flatness vs. Capacitive Load
VOUT
100mV, 50ns
Figure 21. Switching Time
0.035
0.025
0.025
0.015
0.005
0.005
0.015
170
160
FREQUENCY
140
100
150
130
120
110
90
70
30
80
60
50
40
0
20
10
OFFSET VOLTAGE Volts
Figure 22. Offset Voltage Distribution
TEMPERATURE C
2.0
2.0
60
100
40
20
0
20
40
60
80
1.5
0.0
0.5
1.0
1.5
1.0
0.5
V
OS
mV
Figure 23. Offset Voltage Drift vs. Temperature

AD8116
11
REV. A
THEORY OF OPERATION
Loading Data
Data to control the switches is clocked serially into an 80-bit
shift register and then transferred in parallel to an 80-bit latch.
The falling edge of CLK (the serial clock input) loads data into
the shift register. The first five bits of the 80 bits are loaded via
DATA IN (the serial data input) program OUT15. The first of
the five bits (D4) enables or disables the output. The next four
bits (D3D0, D3 = MSB, D0 = LSB) determine which one of
the 16 inputs will be connected to OUT15 (only one of the 16
inputs can be connected to a given output). The remaining bits
program OUT14 thru OUT00.
After the shift register is filled with the new 80 bits of control
data,
UPDATE is activated (low) to transfer the data to the
parallel latches. The switch control latches are static and will
hold their data as long as power is applied.
To extend the number of switches in an array, the DATA
OUT and DATA IN pins of multiple AD8116s can be daisy-
chained together. The DATA OUT pin is the end of the shift
register and may be directly connected to the DATA IN pin of
the follow-on AD8116.
CE can be used to control the clocking
of data into selected devices.
Serial Logic
The AD8116 employs a serial interface for programming the
state of the crosspoint array. The 80-bit shift register (Figure 4)
consists of static D flip-flops while the parallel latch uses transpar-
ent latches that are latched by a logic high state of
UPDATE,
and transparent on logic low of the same signal. The 4-to-16
decoder is a small current-mode multilevel gate array that steers
a small select current to the selected point in the crosspoint array.
The
RESET signal is connected to only the enable/disable bit on
each output buffer. This means that the AD8116 will have a
random configuration on power-up. In normal operation though,
RESET and UPDATE can be used together to alternately en-
able and disable an entire array at once, if desired.
Separate chip enable (
CE), update (UPDATE) and serial data
out (DATA OUT) signals allow several options for program-
ming larger arrays of AD8116s. The function of each bit in the
80-bit word that programs the state of the AD8116 is shown in
Figure 4. In normal operation, the DATA OUT pin of one
AD8116 is connected to the DATA IN of the next. In this way, for
example, an array of eight AD8116s would be programmed with
one 640-bit sequence. In this mode
CE is logic low and the
CLK and
UPDATE pins are connected in parallel.
In one alternate mode of programming, the
CE pin can be used
to select one AD8116 at a time. This might be desirable when
the ability to program just one device at a time is required. In
this mode CLK,
UPDATE and DATA IN are all connected in
parallel. The user then selects each AD8116 in turn (with the
CE signal) and programs it with the desired data. Larger arrays
can also be programmed by connecting each DATA IN signal to
a larger parallel bus. In this way only 80 clock cycles would be
needed to program the entire array. The logic signals are con-
figured so that all programming can be accomplished with
synchronous logic and a continuous clock, so that no missing
cycles or delays need be generated.
APPLICATIONS
Multichannel Video
The excellent video specifications of the AD8116 make it an
ideal candidate for creating composite video crosspoint switches.
These can be made quite dense by taking advantage of the
AD8116's high level of integration and the fact that composite
video requires only one crosspoint channel per system video
channel. There are, however, other video formats that can be
routed with the AD8116 requiring more than one crosspoint
channel per video channel.
Some systems use twisted pair wiring to carry video signals.
These systems utilize differential signals and can lower costs
because they use lower cost cables, connectors and termination
methods. They also have the ability to lower crosstalk and reject
common-mode signals, which can be important for equip-
ment that operates in noisy environments or where common-
mode voltages are present between transmitting and receiving
equipment.
In such systems, the video signals are differential; there is a
positive and negative (or inverted) version of the signals. These
complementary signals are transmitted onto each of the two
wires of the twisted pair, yielding a first order zero common-
mode voltage. At the receive end, the signals are differentially
received and converted back into a single-ended signal.
When switching these differential signals, two channels are
required in the switching element to handle the two differential
signals that make up the video channel. Thus, one differential
video channel is assigned to a pair of crosspoint channels, both
input and output. For a single AD8116, eight differential video
channels can be assigned to the 16 inputs and 16 outputs. This
will effectively form an 8
×
8 differential crosspoint switch.
Programming such a device will require that inputs and outputs
be programmed in pairs. This information can be deduced by
inspection of the programming format of the AD8116 and the
requirements of the system.
There are other analog video formats requiring more than one
analog circuit per video channel. One two-circuit format that is
more commonly being used in systems such as satellite TV,
digital cable boxes and higher quality VCRs, is called S-video or
Y/C video. This format carries the brightness (luminance or Y)
portion of the video signal on one channel and the color
(chrominance or C) on a second channel.
Since S-video also uses two separate circuits for one video chan-
nel, creating a crosspoint system requires assigning one video
channel to two crosspoint channels as in the case of a differen-
tial video system. Aside from the nature of the video format,
other aspects of these two systems will be the same.
There are yet other video formats using three channels to carry
the video information. Video cameras produce RGB (red, green,
blue) directly from the image sensors. RGB is also the usual
format used by computers internally for graphics. RGB can also
be converted to Y, R-Y, B-Y format, sometimes called YUV
format. These three-circuit video standards are referred to as
component analog video.
The three-circuit video standards require three crosspoint chan-
nels per video channel to handle the switching function. In a
fashion similar to the two-circuit video formats, the inputs and
outputs are assigned in groups of three and the appropriate logic
programming is performed to route the video signals.
AD8116
12
REV. A
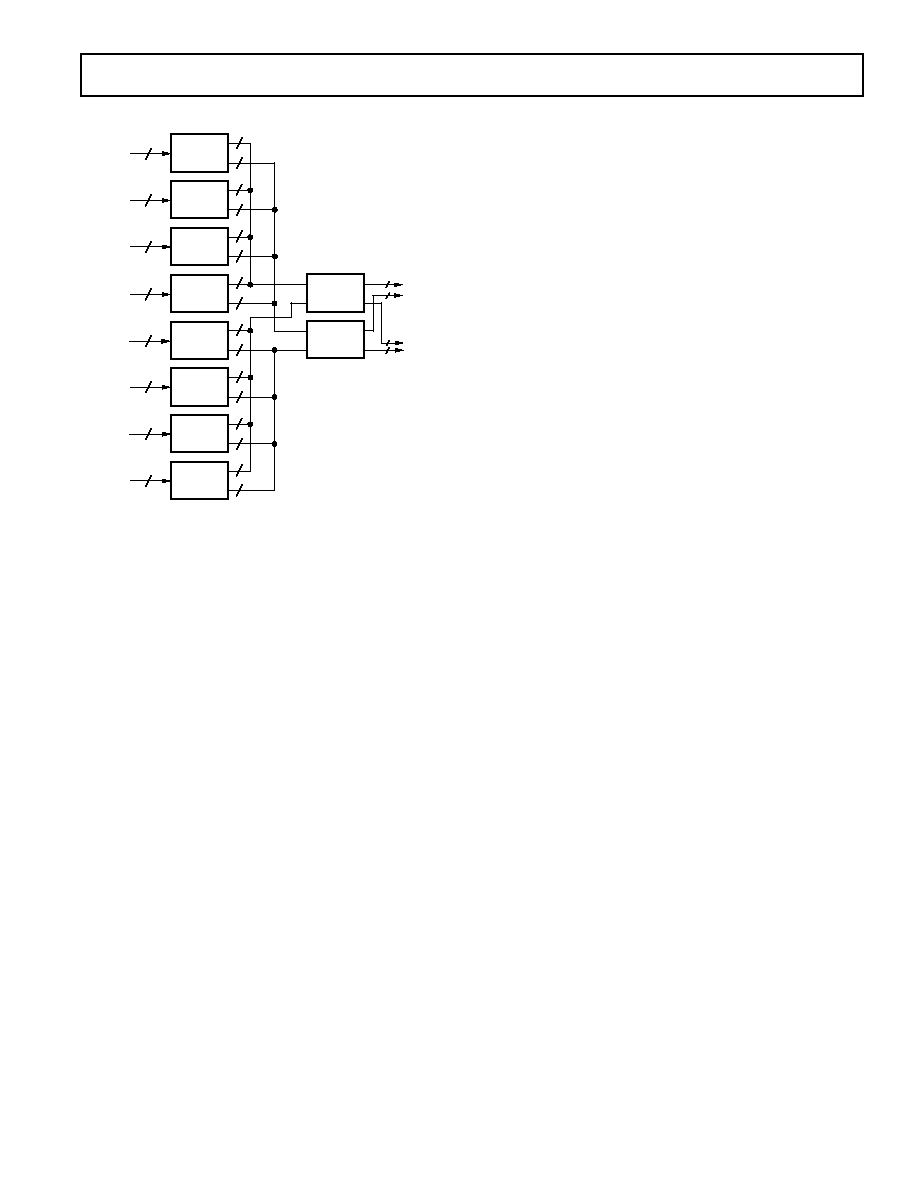
Using additional crosspoint devices in the design can lower the
number of outputs that have to be wire-ORed together. Figure
26 shows a block diagram of a system using ten AD8116s to
create a nonblocking 128
×
16 crosspoint that restricts the wire-
ORing at the output to only four outputs. This will prevent an
enabled output from having to drive a large number of disabled
devices. Additionally, by using the lower eight outputs from
each of the two Rank 2 AD8116s, a blocking 128
×
32 crosspoint
array can be realized.
There are, however, some drawbacks to this technique. The
offset voltages of the various cascaded devices will accumulate
and the bandwidth limitations of the devices will compound. In
addition, the extra devices will consume more current and take
up more board space. Once again, the overall system design
specifications will determine how to make the various trade-offs.
IN
OUT
AD8116
IN
OUT
AD8116
16
015
IN
AD8116
IN
OUT
AD8116
16
1631
16
16
OUT 1631
015
1631
IN
IN
OUT 015
OUT
Figure 24. 32
×
32 Crosspoint Array Using Four AD8116s
IN
OUT
AD8116
IN
OUT
AD8116
IN
AD8116
16
015
IN
OUT
AD8116
IN
AD8116
IN
AD8116
16
1631
IN
AD8116
IN
AD8116
IN
AD8116
16
3247
16
16
16
OUT 015
OUT 1631
OUT 3247
IN
IN
IN
OUT
OUT
OUT
OUT
OUT
OUT
Figure 25. 48
×
48 Crosspoint Array Using Nine AD8116s
Creating Larger Crosspoint Arrays
The AD8116 is a high density building block for crosspoint
arrays over 256
×
256. Various features such as output disable,
chip enable, serial data out and multiple pinouts for logic signals
are very useful for the creation of these larger arrays.
The first consideration in constructing a larger crosspoint is to
determine the minimum number of devices that are required.
The 16
×
16 architecture of the AD8116 contains 256 "points,"
which is a factor of four greater than an 8
×
8 crosspoint and a
factor of 64 greater than a 4
×
1 crosspoint. The PC board area
and power consumption savings are readily apparent when
compared to using these smaller devices.
For a nonblocking crosspoint, the number of points required is
the product of the number of inputs multiplied by the number
of outputs. Nonblocking requires that the programming of a
given input to one or more outputs does not restrict the avail-
ability of that input to be a source for any other outputs.
Thus a 32
×
32 crosspoint will require 1024 points. This number is
then divided by 256, or the number of points in one AD8116
device, to yield four in this case. This says that the minimum
number of 16
×
16 devices required for a fully programmable
32
×
32 crosspoint is four.
Some nonblocking crosspoint architectures will require more
than this minimum as calculated above. Also, there are blocking
architectures that can be constructed with fewer devices than this
minimum. These systems have connectivity available on a statis-
tical basis that is determined when designing the overall system.
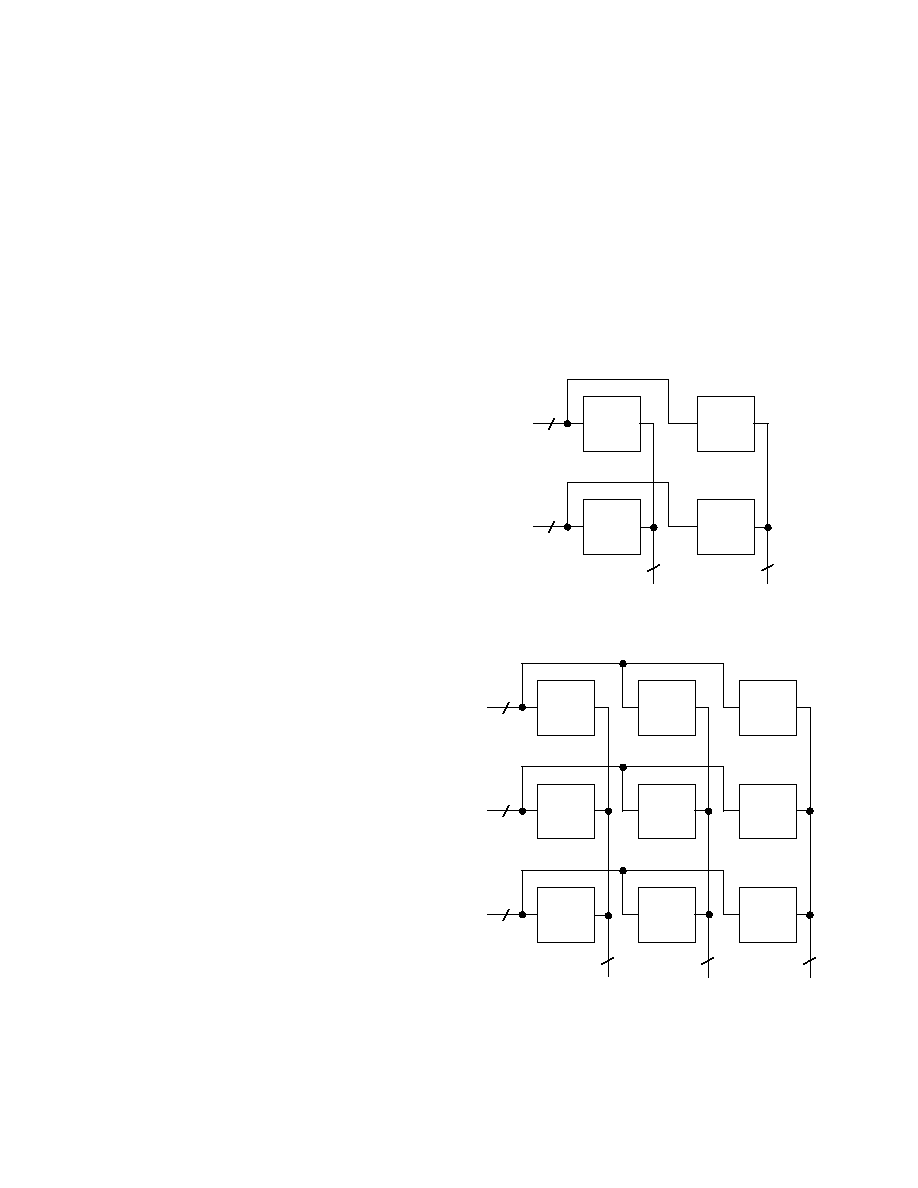
The basic concept in constructing larger crosspoint arrays is to
connect inputs in parallel in a horizontal direction and to "wire-
OR" the outputs together in the vertical direction. The meaning
of horizontal and vertical can best be understood by looking at a
diagram. Figure 24 illustrates this concept for a 32
×
32 crosspoint
array. A 48
×
48 crosspoint is illustrated in Figure 25.
The 32
×
32 crosspoint requires each input driver drive two
inputs in parallel and each output be wire-ORed with one other
output. The 48
×
48 crosspoint requires driving three inputs in
parallel and having the outputs wire-ORed in groups of three. It
is required of the system programming that only one output of a
wired-OR node be active at a time.
It is not essential that crosspoint architectures be square. For
example, a 64
×
16 crosspoint array can be constructed with
four AD8116s by driving each input with a separate signal and
wire-ORing together the corresponding outputs of each device.
It can be seen, however, that by going to larger arrays the
number of disabled outputs an active output has to drive
starts to increase.
At some point, the number of outputs that are wire-ORed be-
comes too great to maintain system performance. This will vary
according to which system specifications are most important.
For example, a 128
×
16 crosspoint can be created with eight
AD8116s. This design will have 128 separate inputs and have
the corresponding outputs of each device wire-ORed together
in groups of eight.
AD8116
13
REV. A
8
8
16
16
IN 1631
16
IN 015
16
16
16
16
16
OUT 016
IN 3247
IN 4863
IN 6479
IN 8095
IN 96111
IN 112127
NONBLOCKING
OUTPUTS
ADDITIONAL
16 OUTPUTS
RANK 2
32:16 NONBLOCKING
(32:32 BLOCKING)
8
8
8
8
8
RANK 1
(128:32)
FOUR AD8116 OUTPUTS
WIRE-ORED TOGETHER
8
8
8
8
8
8
8
8
8
8
8
8
8
Figure 26. Nonblocking 128
×
16 Array (128
×
32 Blocking)
Logic Operation
There are two basic options for controlling the logic in multi-
crosspoint arrays. One is to serially connect the data paths
(DATA OUT to DATA IN) of all the devices and tie all the
CLK and
UPDATE signals in parallel. CE can be tied low for
all the devices. A long serial sequence with the desired pro-
gramming data consisting of 80 bits times the number of
AD8116 devices can then be shifted through all the parallel
devices by using the DATA IN of the first device and the CLK.
When finished clocking in the data,
UPDATE can be pulled low
to program all the device crosspoint matrices.
This technique has an advantage in that a separate
CE signal
is not required for each chip, but has a disadvantage in that
several chips' data cannot be shifted in parallel. In addition, if
another device is added into the system between already existing
devices, the programming sequence will have to be lengthened
at some midpoint to allow for programming of the added device.
The second programming method is to connect all the CLK
and the DATA IN pins in parallel and use the
CE pins in se-
quence to program each device. If a byte or 16-bit word of data
is available for providing the programming data, then multiple
AD8116s can be programmed in parallel with just 80 clock
cycles. This method can be used to speed up the programming
of large arrays. Of course, in a practical system, various combi-
nations of these basic methods can be used.
Power-On Reset
Most systems will want all the AD8116s to be in the reset state
(all outputs disabled) when power is applied to the system. This
ensures that two outputs that are wire-ORed together will not
fight each other at power up.
The power-on reset function can be implemented by adding a
0.1
µ
F capacitor from the
RESET pin to ground. This will hold
this signal low after the power is applied to reset the device. An
on-chip 20 k
resistor from
RESET to DVCC will charge the
capacitor to the logical high state. If several AD8116s are used,
the pull-up resistors will be in parallel, so a larger value capaci-
tance should be used.
If the system requires the ability to be reset while power is still
applied, the
RESET driver will have to be able to charge and
discharge this capacitance in the required time. With too many
devices in parallel, this might become more difficult; if this
occurs, the reset circuits should be broken up into smaller sub-
sets with each controlled by a separate driver.
CROSSTALK
Many systems, such as broadcast video, that handle numerous
analog signal channels have strict requirements for keeping the
various signals from influencing any of the others in the system.
Crosstalk is the term used to describe the coupling of the signals
of other nearby channels to a given channel.
When there are many signals in close proximity in a system, as
will undoubtedly be the case in a system that uses the AD8116,
the crosstalk issues can be quite complex. A good understanding
of the nature of crosstalk and some definition of terms is required
in order to specify a system that uses one or more AD8116s.
Types of Crosstalk
Crosstalk can be propagated by means of any of three methods.
These fall into the categories of electric field, magnetic field and
sharing of common impedances. This section will explain these
effects.
Every conductor can be both a radiator of electric fields and a
receiver of electric fields. The electric field crosstalk mechanism
occurs when the electric field created by the transmitter propagates
across a stray capacitance and couples with the receiver and
induces a voltage. This voltage is an unwanted crosstalk signal
in any channel that receives it.
Currents flowing in conductors create magnetic fields that circu-
late around the currents. These magnetic fields will then gener-
ate voltages in any other conductors whose paths they link. The
undesired induced voltages in these other channels are crosstalk
signals. The channels that crosstalk can be said to have a
mutual inductance that couples signals from one channel to
another.
The power supplies, grounds and other signal return paths of a
multichannel system are generally shared by the various channels.
When a current from one channel flows in one of these paths, a
voltage that is developed across the impedance becomes an
input crosstalk signal for other channels that share the common
impedance.
All these sources of crosstalk are vector quantities, so the
magnitudes cannot be simply added together to obtain the total
crosstalk. In fact, there are conditions where driving additional
circuits in parallel in a given configuration can actually reduce
the crosstalk.
Areas of Crosstalk
For a practical AD8116 circuit, it is required that it be mounted
to some sort of circuit board in order to connect it to power
supplies and measurement equipment. Great care has been
taken to create a characterization board (also available as an
evaluation board) that adds minimum crosstalk to the intrinsic
device. This, however, raises the issue that a system's crosstalk
is a combination of the intrinsic crosstalk of the devices and the
circuit board to which they are mounted. It is important to try

AD8116
14
REV. A
to separate these two areas of crosstalk when attempting to
minimize its effect.
In addition, crosstalk can occur among the input circuits to a
crosspoint and among the output circuits. Techniques will be
discussed for diagnosing which part of a system is contributing
to crosstalk.
Measuring Crosstalk
Crosstalk is measured by applying a signal to one or more channels
and measuring the relative strength of that signal on a desired
selected channel. The measurement is usually expressed as dB
down from the magnitude of the test signal. The crosstalk is
expressed by:
|XT| = 20 log
10
(Asel(s)/Atest(s))
where s = j
is the Laplace transform variable, Asel(s) is the
amplitude of the crosstalk-induced signal in the selected channel
and Atest(s) is the amplitude of the test signal. It can be seen
that crosstalk is a function of frequency, but not a function of
the magnitude of the test signal. In addition, the crosstalk signal
will have a phase relative to the test signal associated with it.
A network analyzer is most commonly used to measure crosstalk
over a frequency range of interest. It can provide both magni-
tude and phase information about the crosstalk signal.
As a crosspoint system or device grows larger, the number
of theoretical crosstalk combinations and permutations can
become extremely large. For example, in the case of the 16
×
16
matrix of the AD8116, we can examine the number of crosstalk
terms that can be considered for a single channel, say IN00
input. IN00 is programmed to connect to one of the AD8116
outputs where the measurement can be made.
First, we can measure the crosstalk terms associated with driv-
ing a test signal into each of the other 15 inputs one at a time.
We can then measure the crosstalk terms associated with driving
a parallel test signal into all 15 other inputs taken two at a time
in all possible combinations; and then three at a time, etc., until,
finally, there is only one way to drive a test signal into all 15 other
inputs.
Each of these cases is legitimately different from the others and
might yield a unique value depending on the resolution of the
measurement system, but it is hardly practical to measure all
these terms and then to specify them. In addition, this describes
the crosstalk matrix for just one input channel. A similar crosstalk
matrix can be proposed for every other input. In addition, if
the possible combinations and permutations for connecting
inputs to the other (not used for measurement) outputs are
taken into consideration, the numbers rather quickly grow to
astronomical proportions. If a larger crosspoint array of multiple
AD8116s is constructed, the numbers grow larger still.
Obviously, some subset of all these cases must be selected to be
used as a guide for a practical measure of crosstalk. One common
term is "all hostile" crosstalk. This term means that all other
system channels are driven in parallel, and the crosstalk to the
selected channel is measured. In general, this will yield the
worst crosstalk number, but this is not always the case.
Other useful crosstalk measurements are those created by one
nearest neighbor or by the two nearest neighbors on either side.
These crosstalk measurements will generally be higher than
those of more distant channels, so they can serve as a worst case
measure for any other one-channel or two-channel crosstalk
measurements.
Input and Output Crosstalk
The flexible programming capability of the AD8116 can be used
to diagnose whether crosstalk is occurring more on the input
side or the output side. Some examples are illustrative. A given
input channel (IN07 in the middle for this example) can be
programmed to drive OUT07. The input to IN07 is just
terminated to ground and no signal is applied.
All the other inputs are driven in parallel with the same test
signal (practically provided by a distribution amplifier), but all
other outputs except OUT07 are disabled. Since grounded IN07
is programmed to drive OUT07, there should be no signal
present. Any signal that is present can be attributed to the other
15 hostile input signals, because no other outputs are driven.
Thus, this method measures the all-hostile input contribution to
crosstalk into IN07. Of course, the method can be used for
other input channels and combinations of hostile inputs.
For output crosstalk measurement, a single input channel is
driven (IN00 for example) and all outputs other than a given
output (IN07 in the middle) are programmed to connect to
IN00. OUT07 is programmed to connect to IN15 which is
terminated to ground. Thus OUT07 should not have a signal
present since it is listening to a quiet input. Any signal measured
at the OUT07 can be attributed to the output crosstalk of the
other 15 hostile outputs. Again, this method can be modified to
measure other channels and other crosspoint matrix combinations.
Effect of Impedances on Crosstalk
The input side crosstalk can be influenced by the output
impedance of the sources that drive the inputs. The lower the
impedance of the drive source, the lower the magnitude of the
crosstalk. The dominant crosstalk mechanism on the input
side is capacitive coupling. The high impedance inputs do not
have significant current flow to create magnetically induced
crosstalk.
From a circuit standpoint, the input crosstalk mechanism looks
like a capacitor coupling to a resistive load. For low frequencies
the magnitude of the crosstalk will be given by:
|XT| = 20 log
10
[(R
S
C
M
)
×
s]
where R
S
is the source resistance, C
M
is the mutual capacitance
between the test signal circuit and the selected circuit, and s is
the Laplace transform variable.
From the equation it can be observed that this crosstalk mecha-
nism has a high pass nature; it can be also minimized by reducing
the coupling capacitance of the input circuits and lowering
the output impedance of the drivers. If the input is driven from
a 75
terminated cable, the input crosstalk can be reduced by
buffering this signal with a low output impedance buffer.
On the output side, the crosstalk can be reduced by driving a
lighter load. Although the AD8116 is specified with excellent
differential gain and phase when driving a standard 150
video
load, the crosstalk will be higher than the minimum due to the
high output currents. These currents will induce crosstalk via
the mutual inductance of the output pins and bond wires of the
AD8116.
From a circuit standpoint, this output crosstalk mechanism
looks like a transformer with a mutual inductance between the
windings that drives a load resistor. For low frequencies, the
magnitude of the crosstalk is given by:
|XT| = 20 log
10
(Mxy
×
s/R
L
)
AD8116
15
REV. A
where Mxy is the mutual inductance of output x to output y and
R
L
is the load resistance on the measured output. This crosstalk
mechanism can be minimized by keeping the mutual inductance
low and increasing R
L
. The mutual inductance can be kept low
by increasing the spacing of the conductors and minimizing
their parallel length.
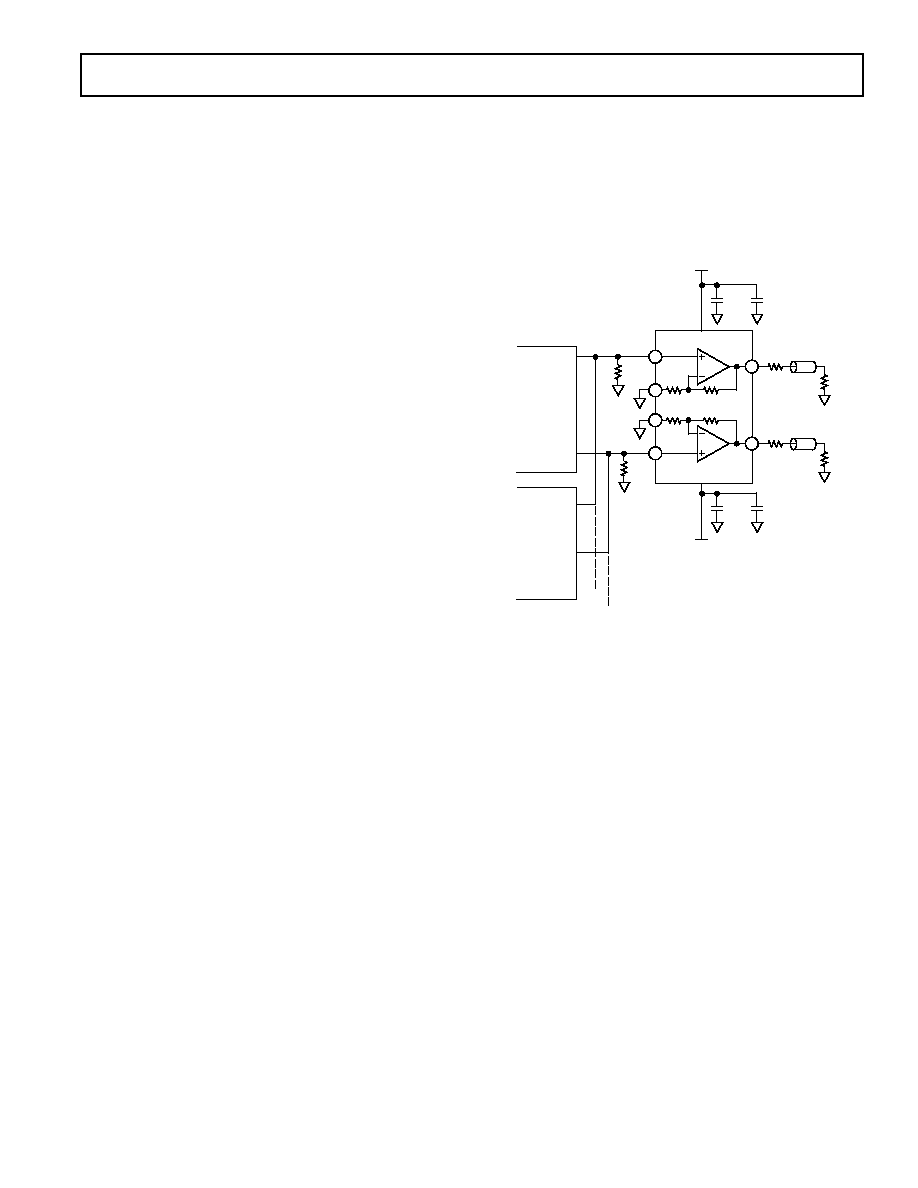
One way to increase the load resistance is to buffer the outputs
with a high input impedance buffer as shown in Figure 27. The
AD8079AR is a dual buffer that can be strapped for a gain of +2
(B grade = +2.2). This offsets the halving of the signal when
driving a standard back-terminated video cable.
The input of the buffer requires a path for bias current. This can
be provided by a 500
to 5 k
resistor to ground. This resistor
also serves the purpose of biasing the outputs of the crosspoints
at zero volts when all the outputs are disabled.
In addition, the load resistor actually lowers the crosstalk com-
pared to the conditions of the AD8116 outputs driving a high
impedance (greater than 10 k
) or driving a video load (150
).
This is because the electric field crosstalk that dominates in the
high impedance case has a phase of 90 degrees, while the mag-
netic field crosstalk that dominates in the video load case has a
phase of +90 degrees. With a 500
to 5 k
load, the contribu-
tions from each of these is roughly equal, and there is some
cancellation of crosstalk due to the phase differences.
PCB Layout
Extreme care must be exercised to minimize additional crosstalk
generated by the system circuit board(s). The areas that must be
carefully detailed are grounding, shielding, signal routing and
supply bypassing.
The packaging of the AD8116 is designed to help keep the
crosstalk to a minimum. Each input is separated from each
other's input by an analog ground pin. All of these AGNDs
should be directly connected to the ground plane of the circuit
board. These ground pins provide shielding, low impedance
return paths and physical separation for the inputs. All of these
help to reduce crosstalk.
Each output is separated from its two neighboring outputs by
analog supply pins of either polarity. Each of these analog sup-
ply pins provides power to the output stages of only the two
adjacent outputs. These supply pins provide shielding, physical
separation and low impedance supply for the channel outputs.
Individual bypassing of each of these supply pins with a
0.01
µ
F chip capacitor directly to the ground plane minimizes
high frequency output crosstalk via the mechanism of sharing
common impedances.
Each output also has an on-chip compensation capacitor that
is individually tied to a package pin via the signals called
AGND00 through AGND15. This technique reduces crosstalk
by preventing the currents that flow in these paths from sharing
a common impedance on the IC and in the package pins. These
AGNDxx signals should all be connected directly to the ground
plane.
The input and output signals minimize crosstalk if they are
located between ground planes on layers above and below, and
separated by ground in between. Vias should be located as close
to the IC as possible to carry the inputs and outputs to the inner
layer. The only place the input and output signals surface is at
the input termination resistors and the output series back termi-
nation resistors. These signals should also be separated, to the
extent possible, as soon as they emerge from the IC package.
1
2
+V
S
AD8079AR
3
4
5
V
S
1k
1k
AD8116
OUTXX
OUTYY
AD8116
OUTZZ
OUTWW
5V
0.1 F
10 F
+
75
75
75
75
8
0.1 F
10 F
+
+5V
TO OTHER
AD8116 OUTPUTS
G = +2
G = +2
Figure 27. Buffering Wired OR Outputs with the AD8079
Evaluation Board
A four-layer evaluation board for the AD8116 is available. This
board has been carefully laid out and tested to demonstrate the
specified high speed performance of the device. Figure 28 shows
the schematic of the evaluation board. Figure 29 shows the
component side silk-screen. The layouts of the board's four
layers are given in Figures 30, 31, 32 and 33.
The evaluation board package includes the following:
· Fully populated board with BNC-type connectors.
· Windows
®
based software for controlling the board from a
PC via the printer port.
· Custom cable to connect evaluation board to PC.
· Disk containing Gerber files of board layout.
Windows is a registered trademark of Microsoft Corporation.
AD8116
16
REV. A
75
INPUT 00
75
INPUT 01
75
INPUT 02
75
INPUT 03
75
INPUT 04
75
INPUT 05
75
INPUT 06
75
INPUT 07
75
INPUT 08
75
INPUT 09
75
INPUT 10
75
INPUT 11
75
INPUT 12
75
INPUT 13
75
INPUT 14
75
INPUT 15
OUTPUT 00
75
OUTPUT 01
75
0.01 F
AV
EE
OUTPUT 02
75
0.01 F
AV
CC
OUTPUT 03
75
0.01 F
AV
EE
OUTPUT 04
75
0.01µF
AV
CC
OUTPUT 05
75
0.01 F
AV
EE
OUTPUT 06
75
0.01 F
AV
CC
OUTPUT 07
75
0.01 F
AV
EE
OUTPUT 08
75
0.01 F
AV
CC
OUTPUT 09
75
0.01 F
AV
EE
OUTPUT 10
75
0.01 F
AV
CC
OUTPUT 11
75
0.01 F
AV
EE
OUTPUT 12
75
0.01 F
AV
CC
OUTPUT 13
75
0.01 F
AV
EE
OUTPUT 14
75
0.01 F
AV
CC
OUTPUT 15
75
0.01 F
AV
EE
0.01 F
AV
CC
AGND
1
2
3
4
5
6
7
8
9
10
11
12
13
14
15
16
17
18
19
20
21
22
23
24
25
26
27
28
29
30
31
32
IN00
AGND
IN01
AGND
IN02
AGND
IN03
AGND
IN04
AGND
IN05
AGND
IN06
AGND
IN07
AGND
IN08
AGND
IN09
AGND
IN10
AGND
IN11
AGND
IN12
AGND
IN13
AGND
IN14
AGND
IN15
DATA IN
CLK
DATA OUT
126 125 124 123 122 121
UPDATE
RESET
CE
NC
NC
NC
NC
NC
NC
0.01 F
0.01 F 0.01 F
DVCC
DVEE
AVEE
DGND
0.01 F
AVCC
127
119
116
118
120
113
115
NC
105
112
NC
97104,
128
AGND
CLIP-ON TEST POINTS
POWER SUPPLY
CONNECTOR
*
AVCC00
OUT00
AVEE00/01
OUT01
AVCC01/02
OUT02
AVEE02/03
OUT03
AVCC03/04
OUT04
AVEE04/05
OUT05
AVCC05/06
OUT06
AVEE06/07
OUT07
AVCC07/08
OUT08
AVEE08/09
OUT09
AVCC09/10
OUT10
AVEE10/11
OUT11
AVCC11/12
OUT12
AVEE12/13
OUT13
AVCC13/14
OUT14
AVEE14/15
OUT15
65
66
67
68
69
70
71
72
73
74
75
76
77
78
79
80
81
82
83
84
85
86
87
88
89
90
91
92
93
94
95
96
AD8116JST
AGND
33
CLIP-ON
TEST POINTS
DIGITAL INTERFACE
CONNECTOR
*
DGND
DATA IN
UPDATE
DATA OUT
CLK
CE
RESET
0.01
F
NC
NC
DVCC
DVEE
AVEE
AV
EE
AVCC
AV
CC
0.01
F
NC
NC
AGND
AV
CC
0.01
F
5663
49
55
4648
4345
42
34
39
36
35
40
38
37
41
AGND
DGND
0.1 F
TO PINS 96,92,88,84
(AVCC)
0.1 F
TO PINS 94,90,86,82
(AVEE)
10 F
10 F
10 F
10 F
*
6-PIN 0.100 CENTER HEADER
MOLEX PART NR. 22-23-2061
MATING CONNECTOR
MOLEX PART NR. 22-01-03067
TO PINS
80,76,72,68
(AVCC)
TO PINS
78,74,70,66
(AVEE)
0.1 F
0.1 F
1
6
AVCC
64
6
1
+
+
+
+
NC = NO CONNECT
Figure 28. Evaluation Board Schematic
AD8116
17
REV. A
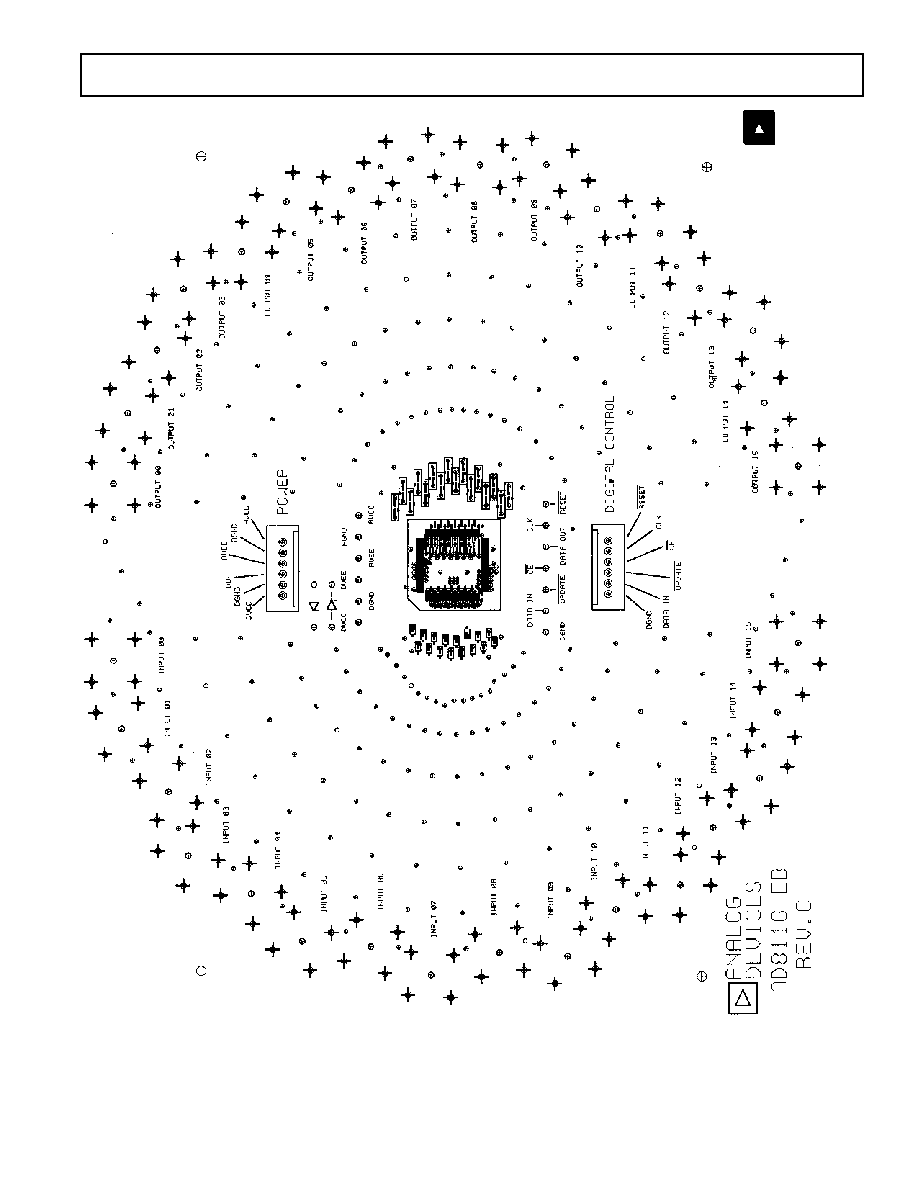
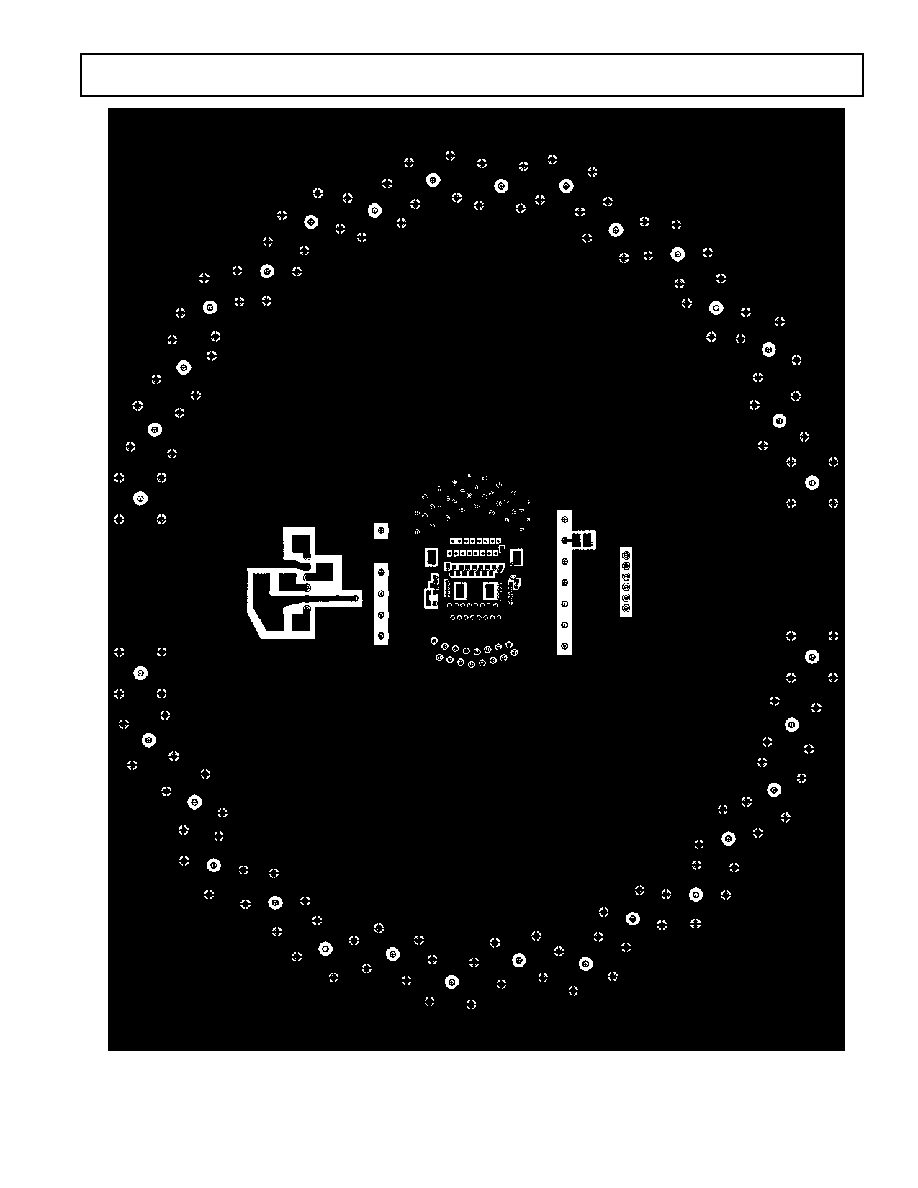
Figure 29. Component Side Silkscreen
AD8116
18
REV. A
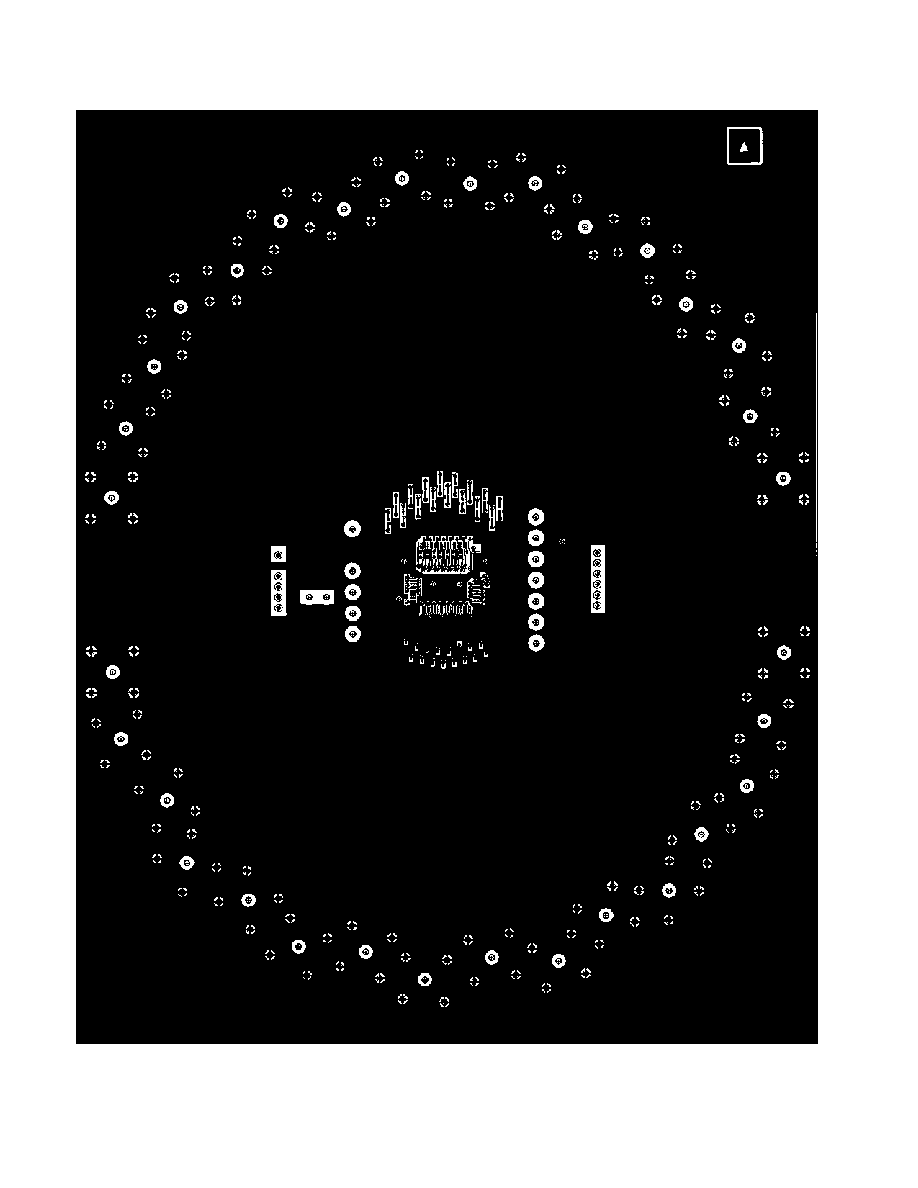
Figure 30. Board Layout (Top Layer)
AD8116
19
REV. A
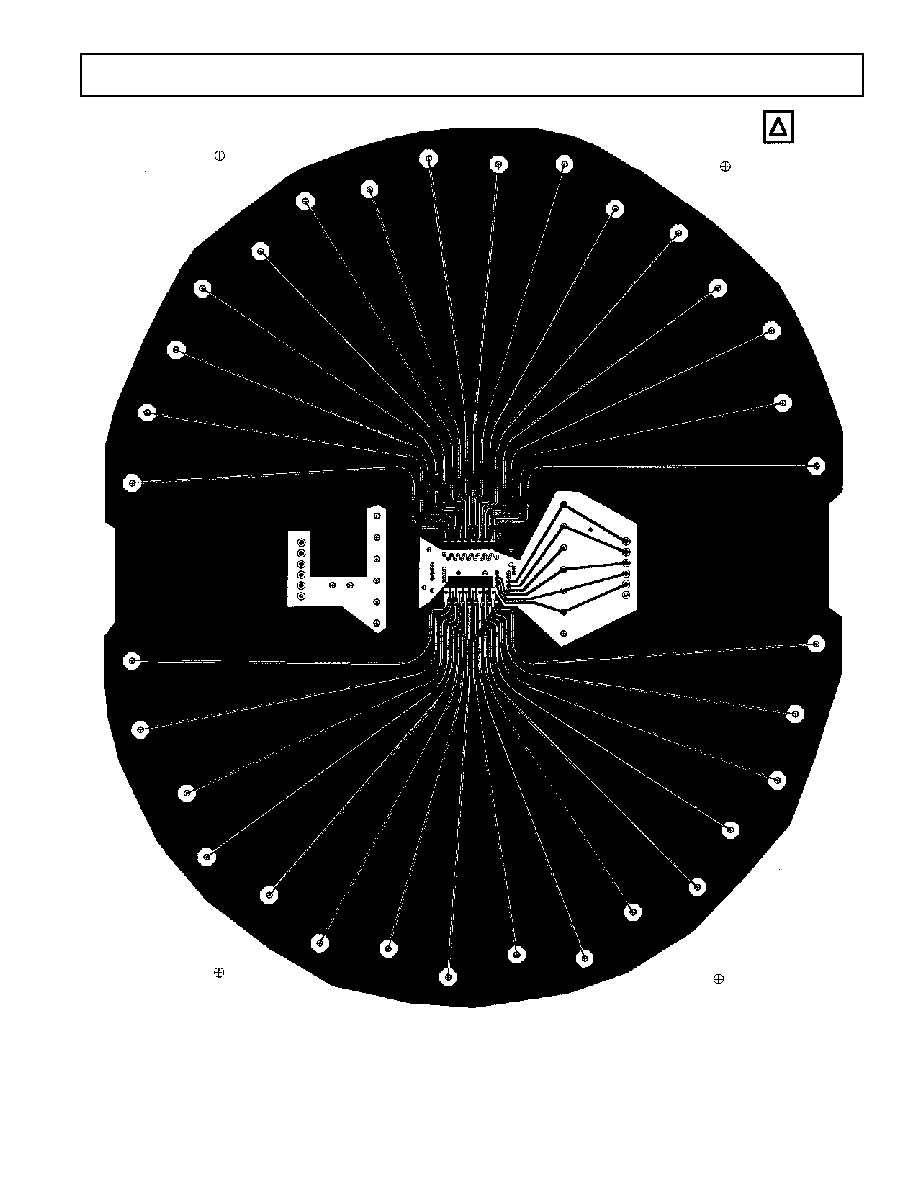
Figure 31. Board Layout (Signal Layer)
AD8116
20
REV. A
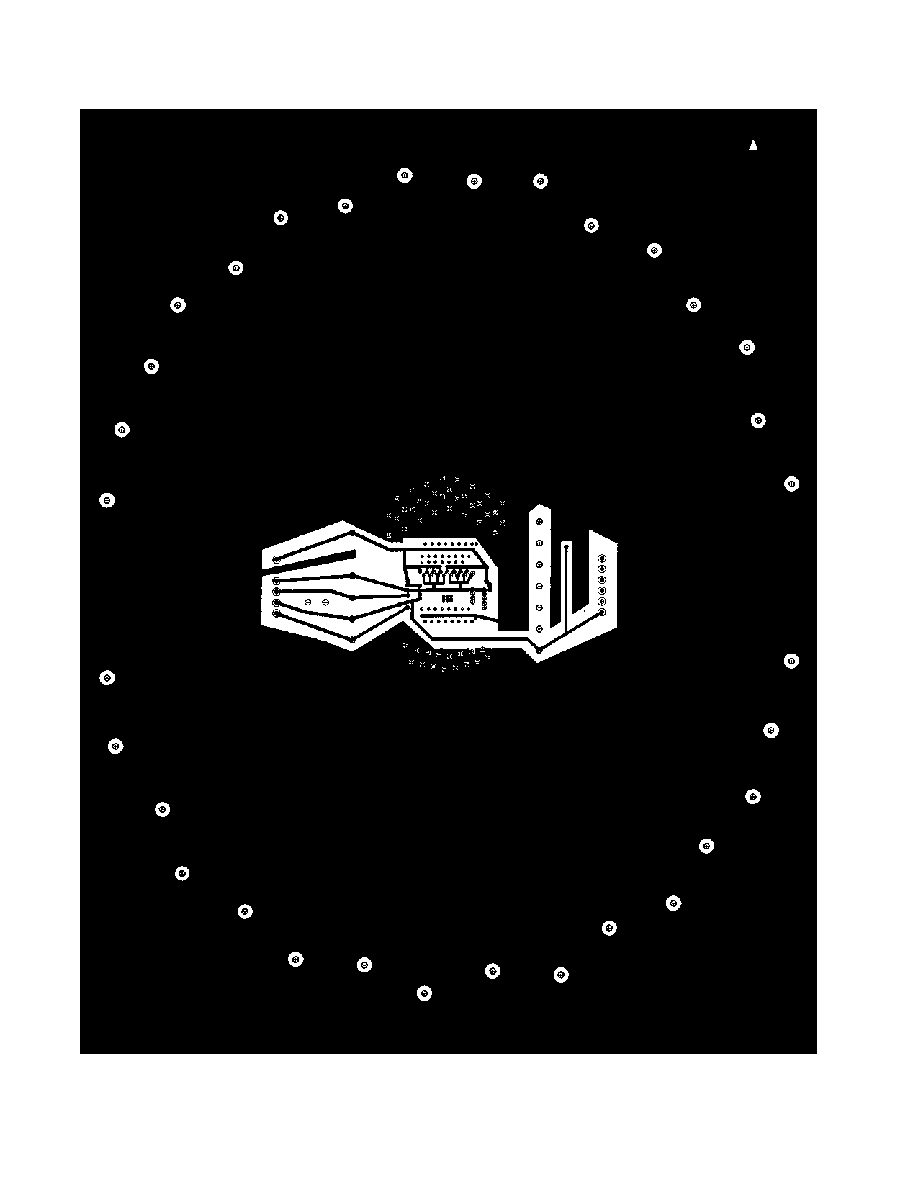
Figure 32. Board Layout (Power Layer)
AD8116
21
REV. A
Figure 33. Board Layout (Bottom Layer)
AD8116
22
REV. A
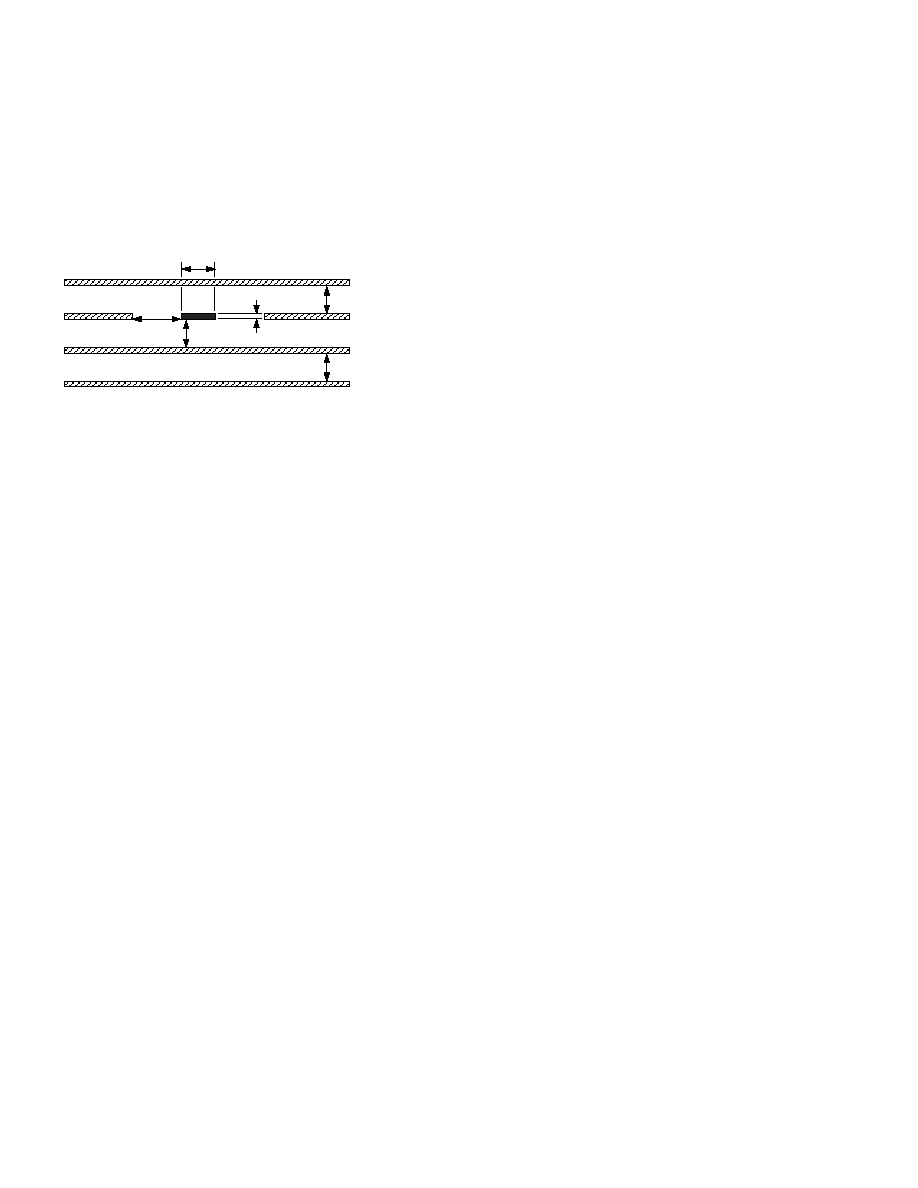
Optimized for video applications, all signal inputs and outputs
are terminated with 75
resistors. Figure 34 shows a cross-
section of one of the input or output tracks along with the ar-
rangement of the PCB layers. It should be noted that unused
regions of the four layers are filled up with ground planes. As a
result, the input and output traces, in addition to having con-
trolled impedances, are well shielded.
w = 0.008"
(0.2mm)
a = 0.008"
(0.2mm)
c = 0.028"
(0.714mm)
t = 0.00135" (0.0343mm)
TOP LAYER
SIGNAL LAYER
POWER LAYER
BOTTOM LAYER
b = 0.0132"
(0.335mm)
d = 0.0132"
(0.335mm)
Figure 34. Cross Section of Input and Output Traces
The board has 32 BNC type connectors: 16 inputs and 16 outputs.
The connectors are arranged in two crescents around the device.
As can be seen from Figure 31, this results in all sixteen input
signal traces and all sixteen signal output traces having the same
length. This is useful in tests such as All-Hostile Crosstalk
where the phase relationship and delay between signals needs to
be maintained from input to output.
The four power supply pins AVCC, DVCC, AVEE and DVEE
should be connected to good quality, low noise,
±
5 V supplies.
Where the same
±
5 V power supplies are used for analog and
digital, separate cables should be run for the power supply to the
evaluation board's analog and digital power supply pins.
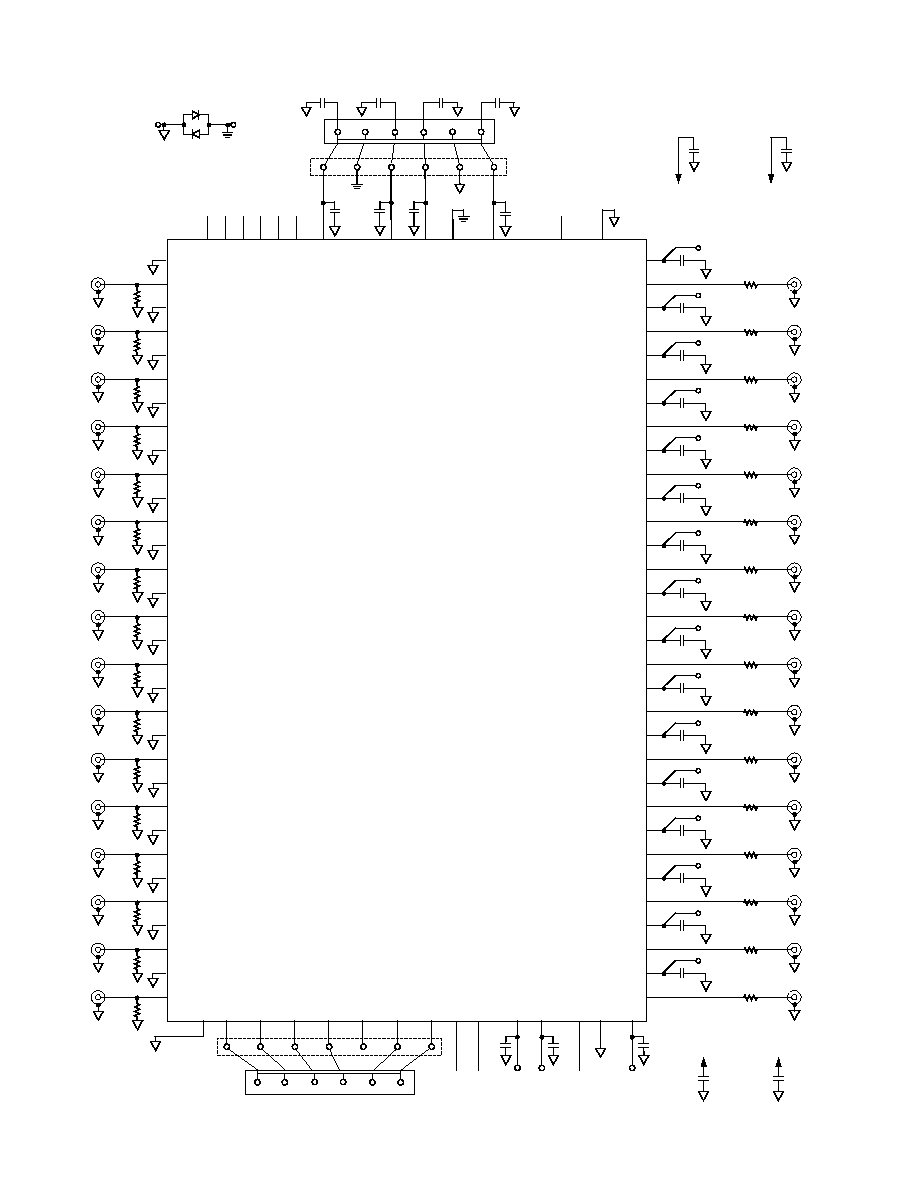
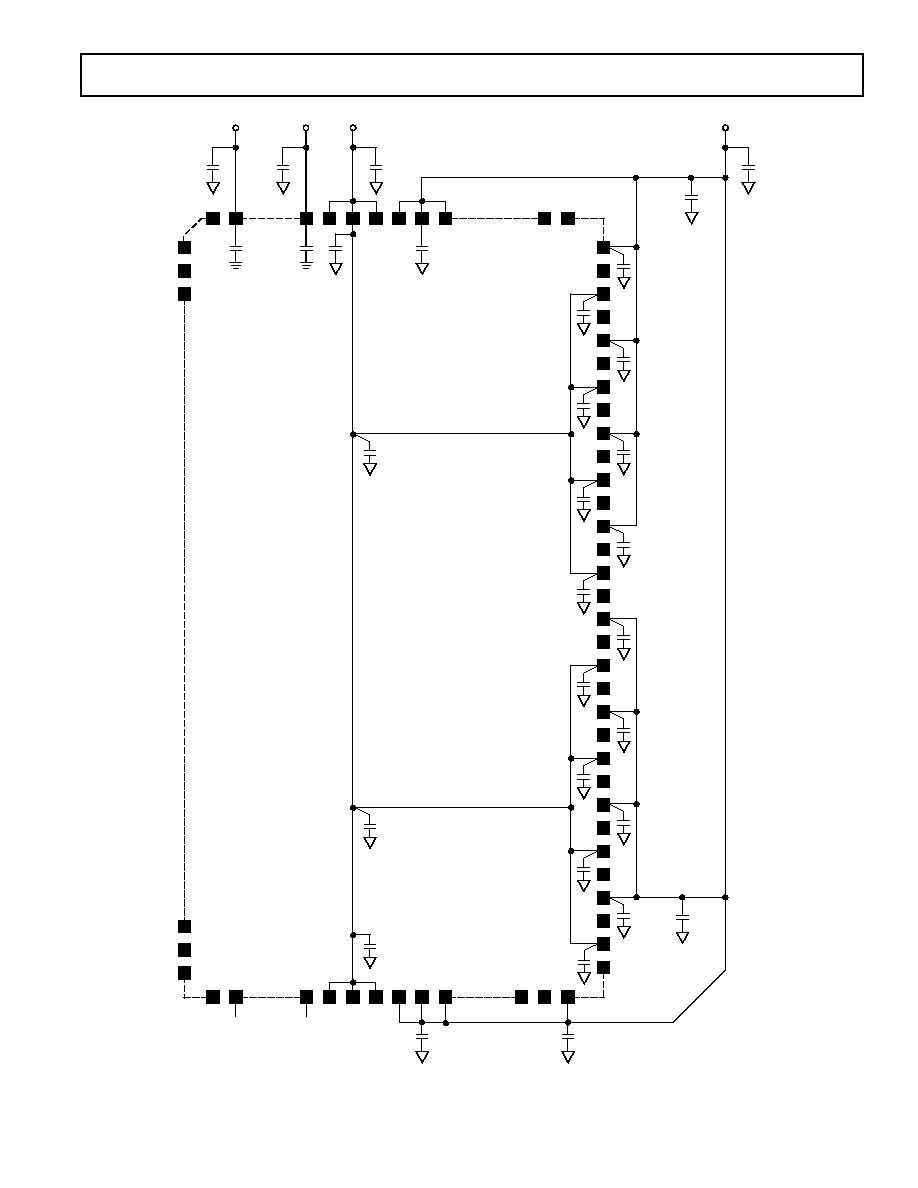
As can be seen in Figure 35, there is extensive power supply
decoupling on the evaluation board. Figure 35 shows the
location of all the decoupling capacitors relative to the AD8116's
pins. Four large 10
µ
F capacitors are located near the evalua-
tion board's power supply connection terminals. These de-
couple the AVCC, DVCC, AVEE and DVEE supplies. Because
it is required that the voltage difference between DGND and
AGND never exceed 0.7 V, these grounds are connected by
two antiparallel diodes. On the output side of the device (Pin 65
to Pin 96), the sixteen output pins are interleaved with the
AVCC and AVEE power supply pins. Each of these pins is
locally decoupled with a 0.01
µ
F capacitor. These pins are also
decoupled in groups of four with 0.1
µ
F capacitors. Due to
space constraints the power supply Pins 34 (DVCC) and 42
(DVEE) are neither connected nor decoupled. These pins are,
however, internally connected to DVCC and DVEE (Pins 127
and 119).
As a general rule, each power supply pin (or group of adjacent
power supply pins) should be locally decoupled with a 0.01
µ
F
capacitor. If there is a space constraint, it is more important to
decouple analog power supply pins before digital power supply
pins. A 0.1
µ
F capacitor, located reasonably close to the pins,
can be used to decouple a number of power supply pins. Finally
a 10
µ
F capacitor should be used to decouple power supplies as
they come on to the board.
AD8116
23
REV. A
1
128
127
119
113
97
96
65
64
48
42
34
33
32
DVCC
DVEE
AVEE
10 F
10 F
10 F
*
*
*
*
*
*
*
*
*
*
*
*
*
0.1 F
0.1 F
*
*
*
*
*
*
*
*
*
*
0.01 F
*
NC
(DVCC)
NC
(DVEE)
NC = NO CONNECT
0.1 F
0.1 F
10 F
AVCC
Figure 35. Detail of Decoupling on Evaluation Board
AD8116
24
REV. A
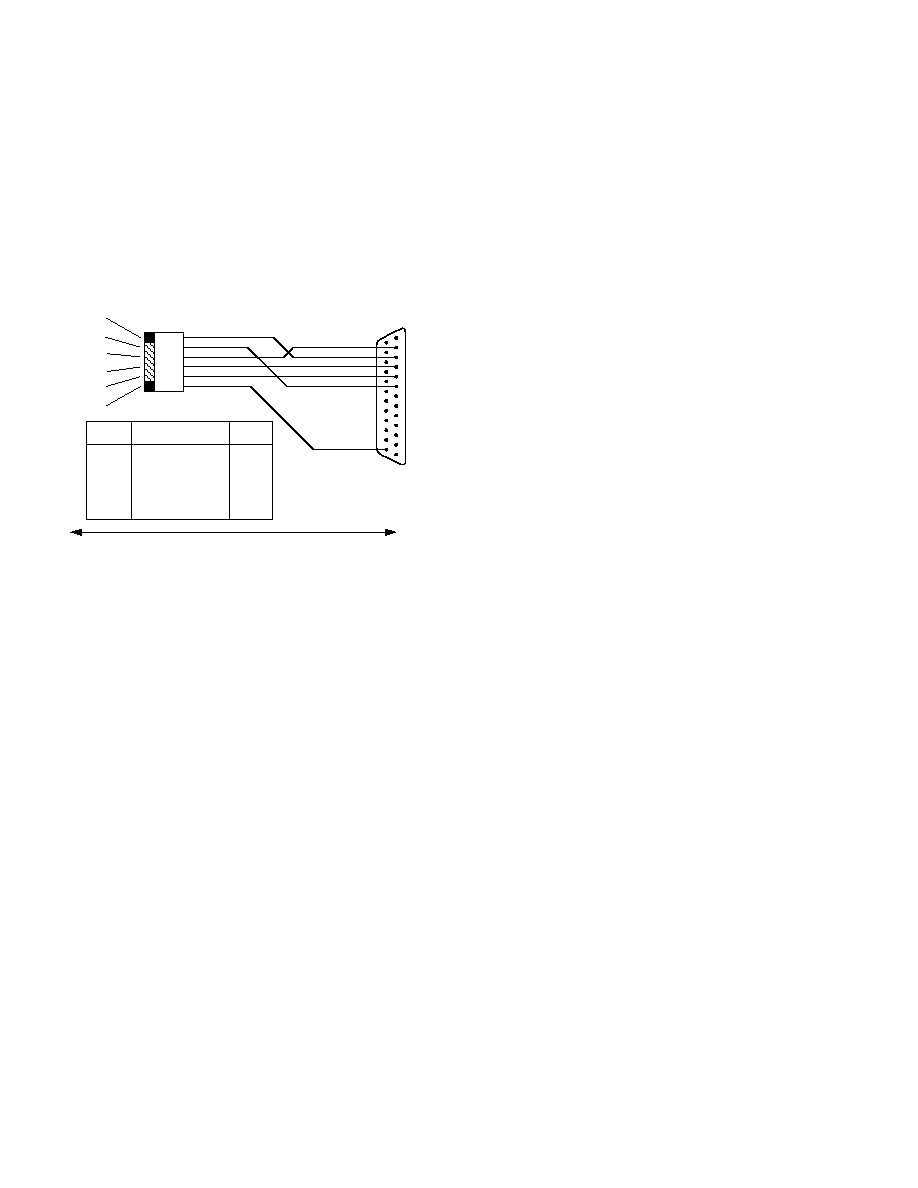
Controlling the Evaluation Board from a PC
The evaluation board include Windows-based control software
and a custom cable that connects the board's digital interface
to the printer port of the PC. The wiring of this cable is shown
in Figure 36. The software requires Windows 3.1 or later to
operate. To install the software, insert the disk labeled "Disk #1
of 2" in the PC and run the file called SETUP.EXE. Additional
installation instructions will be given on-screen. Before begin-
ning installation, it is important to terminate any other Win-
dows applications that are running.
RESET
CLK
DATA IN
DGND
CE
UPDATE
MOLEX 0.100" CENTER
CRIMP TERMINAL HOUSING
1
6
D-SUB 25 PIN
(MALE)
14
1
25
13
EVALUATION BOARD
PC
2
3
4
5
6
25
3
1
4
5
2
6
SIGNAL
CE
RESET
UPDATE
DATA IN
CLK
DGND
MOLEX
TERMINAL HOUSING
D-SUB-25
Figure 36. Evaluation Board-PC Connection Cable
When you launch the crosspoint control software, you will be
asked to select the printer port you are using. Most modern PCs
have only one printer port, usually called LPT1; however, some
laptop computers use the PRN port.
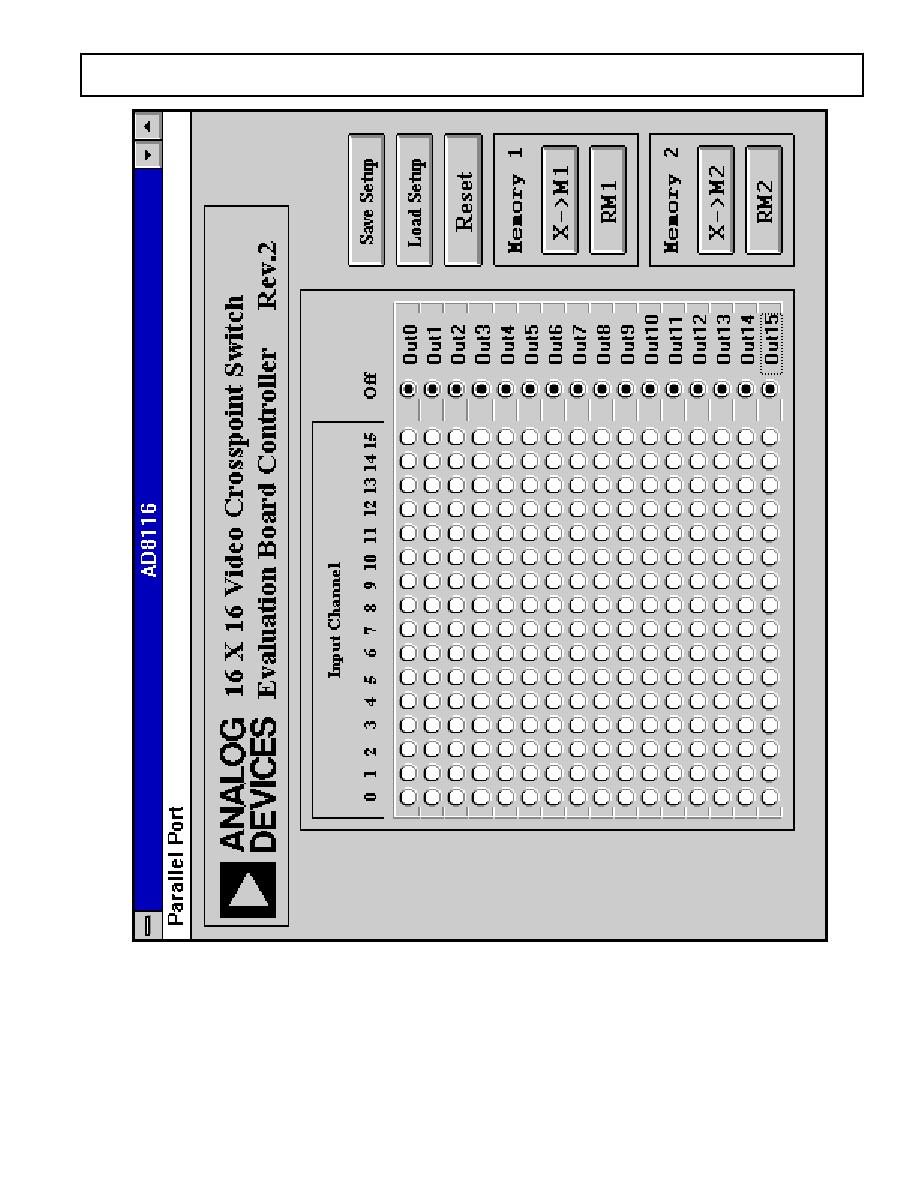
Figure 37 shows the main screen of the control software in its
initial reset state (all outputs off). Using the mouse, any input
can be connected with one or more outputs by simply clicking
on the appropriate radio buttons in the 16
×
16 on-screen array.
Each time a button is clicked on, the software automatically
sends and latches the required 80-bit data stream to the
evaluation board. An output can be turned off by clicking the
appropriate button in the Off column. To turn off all outputs,
click on RESET.
The software offers volatile and nonvolatile storage of configu-
rations. For volatile storage, up to two configurations can be
stored and recalled using the Memory 1 and Memory 2 Buffers.
These function in an identical fashion to the memory on a
pocket calculator. For nonvolatile storage of a configuration, the
Save Setup and Load Setup functions can be used. This stores
the configuration as a data file on disk.
Overshoot on PC Printer Ports' Data Lines
The data lines on some printer ports have excessive overshoot.
Overshoot on the pin that is used as the serial clock (Pin 6 on
the D-Sub-25 connector) can cause communication problems.
This overshoot can be eliminated by connecting a capacitor
from the CLK line on the evaluation board to ground. A pad
has been provided on the solder-side of the evaluation board to
allow this capacitor to be soldered into place. Depending upon
the overshoot from the printer port, this capacitor may need to
be as large as 0.01
µ
F.
AD8116
25
REV. A
Figure 37. Screen Display of Control Software
AD8116
26
REV. A
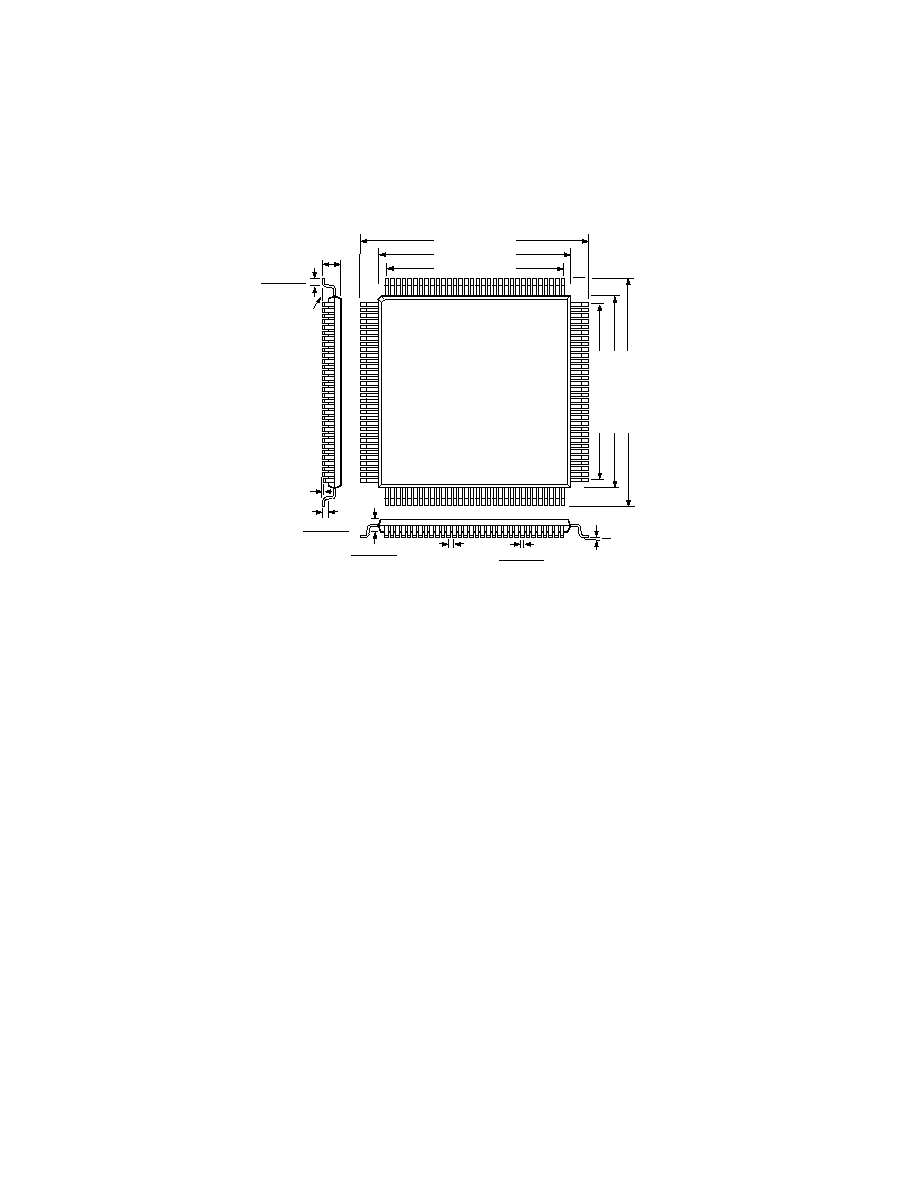
OUTLINE DIMENSIONS
Dimensions shown in millimeters and (inches).
Metric measurements are not rounded. English measurements are rounded.
128-Lead Plastic LQFP
(ST-128A)
TOP VIEW
(PINS DOWN)
1
32
33
65
64
96
128
97
0.488 (12.40) BSC
0.488 (12.40) BSC
0.551 (14.00) BSC
0.630 (16.00) BSC
0.551 (14.00) BSC
0.630 (16.00) BSC
0.009 (0.23)
0.005 (0.13)
0.016 (0.40)
BSC
7
°
0
°
0.057 (1.45)
0.053 (1.35)
SEATING
PLANE
0.063 (1.60)
TYP
0.030 (0.75)
0.018 (0.45)
STANDOFF
0.003 (0.08)
MAX
0.006 (0.15)
0.002 (0.05)
C2441a25/99
PRINTED IN U.S.A.